Tuesday, September 20, 2016

Lepin 15003 Not Lego Town Hall Set Review - Part Three


I'll admit it. I've been procrastinating.  I finished building the Lepin Town Hall last week, but just haven't gotten around to posting the pictures.  Today, I promise to wrap up this blog post.  It's the last of the three part review of the largest Lepin modular set (well, not counting the Ghostbuster's Firehouse or the upcoming Haunted House).  If you missed the first and second parts of this review, you can find part one here, and part two here.

Day Nine


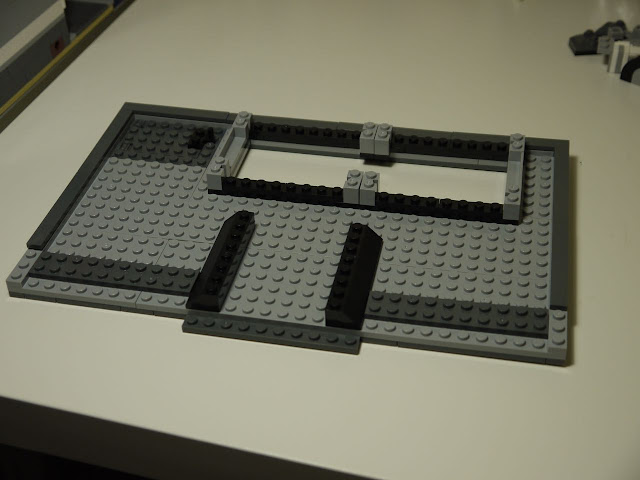
Here's how the Lepin Town hall looks after nine days.  I'm currently at step 30 of the second storey.  If you include the 62 steps of the first floor, I've just completed 92 steps of the instruction manual.


The last ten steps have been pretty mundane, as all I've done is to build up the walls of the second storey and add a few doors and windows.  Pictured above is the new elevator door and buttons.

 The mayor gets some privacy with the addition of a door to his office.


Second storey windows look onto the open atrium.  Not sure why the designers didn't continue using fixed pane windows on the back wall.  The ones provided have opening panes but nobody is going to open and close them at this height.

Front windows and glass door for the small terrace installed.

The administrative assistant will have nice views from her desk.

The mayor also gets an arched opening in his office overlooking the atrium.


Back wall of the town hall.

There were another three more steps to finish building the town hall's second floor, so I completed the remainder of the build.


Here's a few more views of the completed second storey.


Day nine is a wrap, second storey complete.


Day Ten


The first ten steps of the third floor.


A very quick build today.  Just laid out the floor and foundation perimeter for the third storey.


Third storey placed on top of the second storey.


Day Eleven


The walls are going up on the third storey.  This floor is one giant board room.  Sparsely furnished with a grand table, a throne like seat and other chairs.  I don't understand why the elevator on this floor needs an up button, as there's no other floor above this one.  

Installed the rear facing windows using the same design as the second storey.


 Town Hall, rear view.  One hundred and fourteen steps of the instructions completed.

Day Twelve


 On day twelve, we finished the third storey of the Town Hall modular.

The front of the town hall.

Last look at the finished boardroom.  Looks like a super villain meeting has already been booked.


Almost there!

Day Thirteen


The roof.

Roof added to the top of the town hall.

Two skylights made from garage door panels.  These were very tricky to install properly.


Day Fourteen


So all that's left on day fourteen is to build the clock tower.

There's an extension ladder to be used for clock maintenance.

The clock tower attached to the roof.


Here's the steeple with bell inside.


Clock tower and steeple completes the roof of the Town Hall.

The completed Lepin Town Hall, rear view.

Front view of the Town Hall.

These were the leftover parts from the Town Hall build.  I was fortunate in not having any missing pieces.


Here's the Lepin Town Hall next to the Lepin Cafe Corner.

Final Assessment


Design wise, I really like the elevator and the roman columns.  I also liked the twin skylights, but found that there was still not enough light going into the building from the roof.  The Town Hall is adequately furnished, which is on par with the Lepin Fre Brigade.

The build quality of the Lepin Town Hall set was excellent.  No problems with any loose or ill-fitting pieces.  I found that there was hardly any residue on the bricks, which was more noticeable on the Cafe Corner and Fire Brigade.  No missing or damaged parts.  


I paid about $90 CAD, making it my most expensive Lepin modular purchase to-date.  If you don't have this set yet, go buy it now.  You won't be disappointed.


Thursday, September 15, 2016

Hsanhe 6411-2 Not Lego McDonalds Restaurant Set Review

It's time for another building set review.  Today, it is the Hsanhe Fast Food Restaurant.  It's part of the Mini Street series.  This model number is 6411-2 and it has 194 pieces and two minifigures.  As mentioned in a previous post this small modular building is part of Hsanhe's six building offering of different shops.

The first thing you might notice about this set is that there is no mention of McDonalds, even though it's obviously copying the logo design and colour scheme, right down to the happy box handle on the roof.   Please be reminded that Lego never produced any set like this, so it's not a Lego bootleg.

In this set, we find a male customer minifigure and a restaurant employee minifigure.

Just in case you wanted to see how they looked from behind, here's the pic.  The customer looks to be wearing a hoodie.   Both figures are near Lego quality in fit and finish.

The restaurant has seating for two with a table and umbrella.  There is also a small flower patch and fire hydrant.  I chose to swap the locations of the two because it was awkward for the customer to be setting right next to the hydrant.  Our customer is getting ready to eat his hamburger and the store employee looks like he might be delivering an order.  McDonalds don't do deliveries in Canada, but I know they do in the big cities in Japan.  Does McDonald's deliver food to you in your country?

Here's a side view of our fast food joint.   The sizable awning gives good protection from the rain and sun.

Around back, we can see the inside of our fast food restaurant.  It's a little dark, but there's a cash register and order microphone on the counter.  Looks like someone forgot their burger order.  There's a grill to cook a burger with some condiments.  Above the grill is a storage container.

When you come into the restaurant, there is a counter for eating.  I put some ceiling lights on the inside but they ended up being too low because the ceiling is not that high.

Our Hsanhe restaurant is in a good location with lots of traffic and sales, so we could justify hiring another employee.  She's a trainee, so please be kind to her.

Here's the trainee pointing out how low the ceiling lights are hanging. She hits her head on them all the time.

Ok, so the lights were a bad idea, so we got the trainee to take them down.

Let's do some minor renovation to the fast food restaurant.  First let's remove the roof.

We definitely need a higher ceiling, so let's add a row of bricks, and make it easier to remove the roof in future.

Ta-da, new higher ceiling.

But wait, we're not finished. Let's add some real lights to the building using a couple of 2x3 light blocks.

Our trainee doesn't have to work in the dark anymore, yay!

Looks like customers and employees are happy with the higher ceiling and new lights.
Well, that's it, thanks for looking at our slightly enhanced Hsanhe Fast Food Restaurant modular.  

Brand: Hsanhe
Series:  Mini Street Modulars
Model: 6411-2 Fast Food Restaurant (Mc'Donalds clone)
Number of pieces:  194, plus about another 10 that I added myself.   You get two minifigures with the set, but not the trainee, sorry.