Monday, July 4, 2022

Funwhole Wood Cabin Building Set Review FH-9001 (Not Lego)

Hey all, time for another not Lego set review, and this time I'm doing a deep dive into the Funwhole FH-9001 Wood Cabin building set, a very uniquely designed set.

Intro/Overview

My review will cover all aspects of the set including lighting, brick quality, ease of build and overall set design.  I'll point out the hits and misses of the set and at the end, I'll assign my subjective rating out of 5 stars.  

A huge thanks to Funwhole for providing me with the set to review.  With that said, all opinions are my own.

Where to Buy

If are looking for Funwhole Wood cabin set, you can find it on the Funwhole website and also from the FunWhole Amazon store.


About the Set

In an earlier post, I reviewed the boxed set and the contents therein.  It was so nice of Funwhole to include the box when they sent the sent out to me.  In that post, I looked at the number of pieces, the stickers and did a detailed breakdown of each of the bags and also looked at the lighting kit which is also included in the set.

About the included Lighting

So I think the Wood Cabin set is a really good value because it already comes with the lighting kit which in normal cases, costs an extra $20 to $30 if you were to purchase from a specialty retailer like Lightailing.com

Of note, the lighting provided in the kit does seem to be sourced by Lightailing.com and the components are identical to the Briksmax parts I've used in lighting my Detective's Office modular building and more recently, lighting the custom Blade Runner Spinner.

While the quality of the lighting is very good, on the rare occasion, sometimes faulty components can be missed, so it's always a good idea to test all of the lighting before installing it into your building set.

As a reminder here is what all the lighting specific components look like for the FunWhole wood cabin.   You can see that some of the lighting is packaged according to the section of the build specified in the manual, so that there's no confusion.   

Funwhole conveniently provides a switched battery pack that you can plug the USB adapter to.  


Please note that you have to provide your own set of AA batteries, you'll need three of them to power the lighting throughout the house.

Most of the lights will plug into the provided 8 port expansion board.   

Go ahead and connect them to make sure that they all work properly.

Funwhole uses the same lighting system as Briksmax.  For a detailed primer of how the lighting kits work, please check out my blog post here.

Something new that Funwhole introduces is the contact points so that the upper floor of the Wood cabin doesn't need the lighting to be plugged into the expansion board.  Instead, there are two types of special bricks that contact each other and provide the current to turn on the second floor lighting.  Pretty ingenious.  Ok, let's get into it!

The wood cabin manual is broken down into seven sections.  I'll briefly look at each sections.

Build Section 1


In section 1, most of the building process revolves around making the foundation for the wood cabin.  It sits on a standard 32x32 stud baseplate.  The foundation occupied about 60% of the baseplate with the remainder used for landscaping.  There's a lot of foliage and landscaping pieces but I chose not to add the until completing the final steps of the wood cabin, in case parts fell off during construction.

There is a crawl space/cellar under the wood cabin floor where several crates sit.  The crawlspace can be accessed a set of stairs from the main floor.  It's a good place to put the battery pack and wires for lighting.  Around the perimeter, are some wooden fences, one which encloses a storage shed for logs used by the wood burning fireplace (more on that later).

During this phase, the front steps are installed, as are the pillars for the yet to be built front porch.  Some of the lighting components are introduced such as a light in the cellar and two more lights that flank the log shed.

Oh, before I forget, you might see one or more mini figures pictured during my build.  They are from my own collection and please be aware that the Funwhole Wood Cabin does not come with any mini figures, although in my opinion, the set should have included some.


Build Section 2


Section 2 of the manual focuses on the wood cabin floor.  Here you will find the access door to the crawl space.  There are predominately nougat coloured floor boards throughout the main floor as well as the front porch.


Here are some of the initial 
interior furnishings introduced in section 2.  Some storage cabinets, tables, and a record player.  The makings of a nice bathroom are also at hand.  

At this point, I want to say that the quality and finish of the bricks is excellent and clutch too.  You really cannot differentiate these bricks from Lego bricks.

Build Section 3

The first exterior wall is constructed and put into place.


Wow, is this a nicely detailed kitchen or what? Do kind of wish it had room for a refrigerator though.  The bathroom gets some privacy walls and a sliding door.

That love seat looks a bit small.   A larger sofa might be more welcoming.  For now we will just chill and listen to some music.  This completes section 3.

Build Section 4

In section 4, we finish building the front porch ...

and detail the walls ...

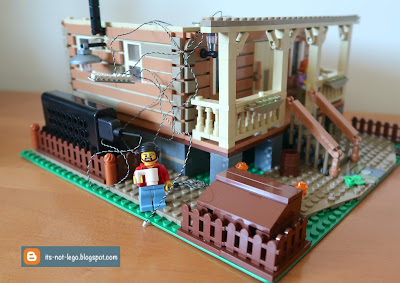
don't mind the wires, these are temporary to see how everything tests out ...

Er, no back wall!  So this isn't modular style, as much as it is dollhouse style.  It would have been better if we got a back wall on hinges.   Kind of disappointed.

Luckily there's a bookshelf and this nice looking wood stove.  I really like the lighting inside the stove.


The kitchen gets a table with seating for four.  All foodstuffs come with the set!

To wrap up section 4, we do an exterior light test.

Oh, almost forgot to mention, see that paper with the two copper discs?  That's the connection point for the second storey. The underside of the second storey has a brick that completes the circuit, to permit lighting there (see next section).

Build Section 5


As mentioned earlier, here's the flip side of the second storey.  A LED light strip will illuminate the first floor from the ceiling, and the small 1x2 connection brick is what will power the lights on the second floor.

Section 5 completes the  second floor loft/bedroom.  The bed looks comfy enough, with end table and nightstand.  There's also a small desk.  Although the wood cabin doesn't come with minifigs, it does come with a dark gray cat.  Access to the second floor is via a hinged ladder (not pictured).

The second floor is attached to the main floor to do a quick lighting test before we move on to section 6.  Everything A-ok!

Everything is nicely lit up!   Look how bright the kitchen and living areas are.  Although you can't see it in this picture, there's lighting in the bathroom as well.  Just love it.

Build Section 6

Here's the construction of the cabin roof ...

and the roof for the porch.

And here is how the wood cabin looks with the roof on.


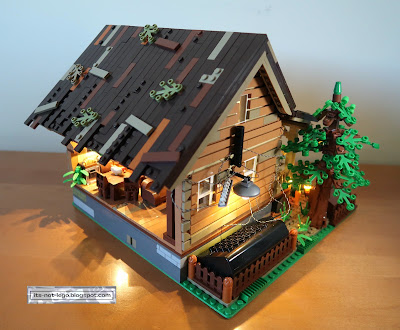
Ok, here's where the Funwhole wood cabin loses a bit of shine for me.  The cabin roof doesn't attach firmly anywhere.  It just sits atop the walls and it wobbles.  The same goes for the porch roof, it's attached to the main roof but doesn't attach to the actual porch itself.  So basically, the roof just kind of floats on top of the building.

Also, the pitch and length of the back half of the roof looks a bit asymetrical for me. Did I build it wrong or is it just me?  It's kind of disappointing that the roof construction and design doesn't match the excellent build of the cabin itself.


A lighting test to wrap up section 6.

Build Section 7

An unexpected surprise is this build of a sheep.  I wish I could say he's little but he's not.


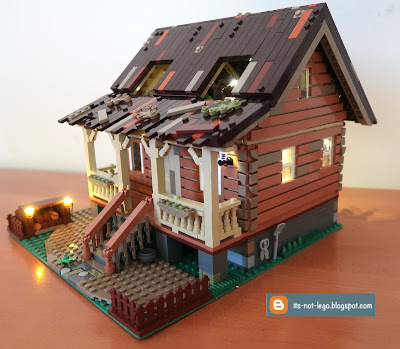
The completed Funwhole wood cabin with dormer windows added.  As you can see I've added in all of the landscaping that should have been there from Section 1.  There's also a fairly decent representation of a conifer next to the cabin.   This is the daytime look.

And here's the Funwhole wood cabin lit for for the evening.


Ok, so let's talk about the two dormer windows.  Each of them have an embedded LED light that uses the connection point on the roof.  So the idea is when you seat the dormers into the roof, the lights will come on automatically.  Sadly, this did not work for me.  

Because the roof was loose to begin with, the dormers also would not stay fixed into the roof, and because of that, the dormer lights couldn't make the connection properly.  I tried to re-seat the connections several times, but at best I could only get one dormer light to come on, never both.

I checked the videos of a couple of Youtubers who reviewed the Funwhole wood cabin and it did not appear that they had the issues I had.


Opinion and Rating

Ok, let's summarize what I liked and what could be improved about the FunWhole wood cabin.

I thought the Funwhole brick quality, finish of the bricks and clutch was excellent.  The cabin interior was extremely detailed and laid out nicely.  Definitely the wood stove was my favourite interior piece.

The exterior has a nice woodsy feel to it and big tree outside is a nice touch.  he porch is nice and there's lots of landscaping, with flower pots and carrots to boot.  The sheep is cute albeit it's a bit large for the set.

For the most part the lighting worked as intended (except for the dormer windows), and it was nice to have that as a standard part of the set, making a set this size good value for the money.  Remember that this set has just under 2100 pieces and retails for about $100 USD.

I thought the Funwhole set would have benefited from having some minifigures for play value.  I also would have liked the cabin to have a hinged back wall.  And printed parts instead of the sticker sheet (which I didn't use, BTW).

I couldn't get my dormer windows to seat properly into the roof, so maybe that's on me to try to rebuild that portion of the set.  Overall, it's a decent set for the money.

For my rating, I'll give the set 4 out of 5 stars.    Agree or disagree with my rating?  Feel free to leave your comments below!

Thanks for visiting and talk to you in my next post!

Tuesday, May 31, 2022

Bela 10871 Pickup and Caravan Set Review (not Lego)

Hey brick fans, here's a cheap set I found on Aliexpress back in December 2021, but just got around to building it now.  It's the Bela/Lari Pickup and Caravan set 10871, which is a near perfect knock off of Lego 60182.  Now that the chinese brick companies are starting to design and develop their own sets, these old clone sets are getting harder and harder to find.  Anyways, let's start the review!

In the past, this Lego copy has previously been cloned by Lepin and Sheng Yuan as well.  This latest clone by Bela has 344 pieces and comes with one instruction manual, one sticker sheet and three reproduction minifigures.   My set came wrapped in the standard white plastic bag and inside there are seven bags of parts.

Here's the sticker sheet.  Check out the license plates that use the Bela set numbers instead of the Lego set numbers.

This being such a small set, I just opted to rip open all the bags and dump them together.

Here's all the parts that make up the mini figures and their accessories, separated from the rest of the bricks.

You can judge for yourself on whether you think the quality of the mini figures is on par with the original Lego versions.  The torso and face prints are pretty decent, imo.


So typical of the knock off sets are the scratched transparent pieces, and this set was no exception.  Hard to tell from the pictures, but yes, the windows are scuffed.

Instructions are clear and easy to follow.  Aside from the window pieces, the other bricks are good quality.  I encountered one or two bricks that had less than adequate clutch, but once assembled together, the pieces were solid.

Here's the pickup truck, looks to me like a ford F150.  I feel like it could have been improved by adding opening doors, seats inside the cabin, and maybe some offroad lighting on the roof.

Here's the caravan section under assembly.  There appears to be an oven, a cabinet with coffee maker, a table and two chairs that can swivel.  His and her mugs complete the interior accessories.

Can you tell that the Mr and Mrs are ready for a road trip?


Only one problem though, you might be able to squeeze two people into the overhead bed, but there are three mini figures in the set.  Where is the third person supposed to sleep?  May be the two swivel chairs could be replaced by some custom chairs that can lay flat?

Most caravans have a small washroom, but the Lego designers decided to omit it on this set.  I think that they could have easily extended the caravan by about 6 studs to put a washroom in it.

The completed pickup and caravan set complete with all the accessories, including a sailboat, a propane tank and frying pan, with crab and fish.  You also get a net and a camera.

The pickup truck has a trailer hitch in addition to the fifth wheel.  It could probably be used to tow boats or dirt bikes and such.


The dual axle caravan can be parked on it's own, when the pickup has to go get gas or buy groceries.


The normal way to get into the caravan is via the door.  It has a handy step rail to make it easier to get in.

The top canopy can be removed to access the sleeping quarters.

The other side of the caravan opens up to allow playability.  There's a sticker that's supposed to represent a TV.  To get the TV signals, there's a satellite dish on the roof.


It's time to leave the campground.  Here's a first, I actually used the stickers that came with the set.  Makes the caravan look more authentic, although I still suck at sticker application, as evidenced by the crooked license plate.


For my review, I will give this set 4.5 stars out of 5.  It loses half a point because of the scuffed windows and a couple of minor brick clutch issues.  No extra parts in this set. Fully worth the little bit of money I spent for this set, though.


If you are interested in getting this set off Aliexpress, you can use this link to search for the original Lego set code 60182 or you can try this link to search for the Bela 10871 set code.  In either case, the links should let you find the Bela 10871 pickup and caravan set on Aliexpress.

Here are the Lego stats from Brick Economy.  Set 60182 was released in 2018 and retired in February 2020.  The average price of a new set goes for approx $80 USD.


And this is what I paid for Bela 10871, the knockoff version of this set.

Monday, May 23, 2022

Not Lego Sembo 601111 Magazine Kiosk Review

Hey brick fans, I'm back after a bit of a hiatus!

I've moved out my house for the next few months until renovations can be completed.  As a result, I haven't been buying as many brick sets as I normally would.  In March and April, I only bought four new sets off Aliexpress.  I got the Leji clone of the boutique hotel, a couple of MOC clones, 60s batmobile and an imperial troop transport.  I'll try to review those soon.

In this post, I will be reviewing the Sembo 601111 magazine kiosk or newstand.  Sembo calls the set a newstand, but there aren't a lot of newspapers included.  They look more like magazine covers to me IMO.

The set consists of 119 pieces and includes one minifigure.  

Here's everything you get in the set:  A two sided instruction sheet, four bags of parts, a couple of plates and a sticker sheet.


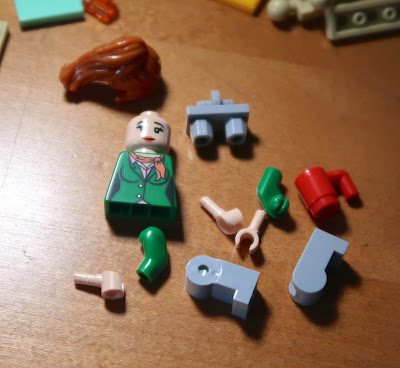
The mini figure comes completely disassembled, so you have to put it together yourself.


Here's how the kiosk lady looks like when assembled.  I guess she's better looking than a crusty old guy.


I was hoping that this Sembo set would include printed pieces, but no, I just got a sticker sheet.  On the bright side the stickers aren't skimpy or thin, and they have a sparkly texture to them. They were easy to affix to the tile pieces.  As mentioned previously, the stickers look like magazine covers.  Only one sticker says Sembo news. Some of the other stickers are for products like candy and juice.  I can probably reuse them in my 7-11 store in future.


Other than the stickers, this set doesn't use any special pieces, so if you have the spare bricks laying around, I'm sure you can make your own news stand or kiosk from the instructions above.


Here's all the pieces after you empty the four bags.  The brick quality is quite good, and I didn't find any scuffs or scratches.  I did find that the brick texture was softer than Lego bricks.  Other than that, no clutch issues and building the set is effortless and could be managed by little kids too.


Simple back wall and floor.  Regarding the base, it has little wheels for rolling the kiosk into place.  It also has a bracket that I guess could be used to attach to the back of a vehicle to pull it around.


Accessories include a tilting chair and a small table for the coffee mug.

After assembling the kiosk frame, it's time to place the stickers!  The chair and table just fit next to the built-in magazine racks.  Not much room for anything else.


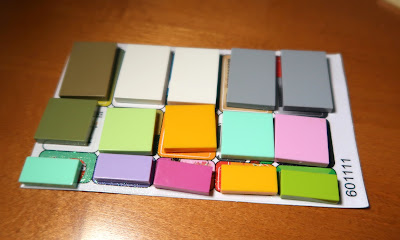
I tried my best to match up the coloured tiles to the stickers as per the instructions, but I'm sure you could just use whatever you wanted as well.


Here are some of the stickers applied to the tiles, then put onto the side panels of the kiosk.


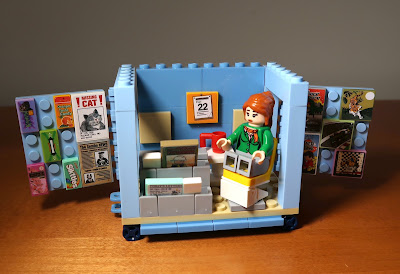
Here's the other side of the kiosk wall.  Both walls can fold in for ease of transport, I guess.  Kind of a mixed bag for the stickers, but they do have mini figure characters on them.


These are the stickers that go inside the kiosk.


Tada, the kiosk is complete!  Well, not quite. I need to put the roof on.


On the ceiling you get a ceiling fan and a light.  Good for tending the kiosk on those hot nights.


Normally, you would have the side doors open to display the magazines, but here they are folded in and ready for travel.


Before hooking up her kiosk, the lady always does a walk around to make sure everything is intact and stuff hasn't fallen off.  Looks like she has given the A-OK.

Here are the extra left over parts from the set.  Yours might vary.


This set is part of a 4 set series, the others are food stalls on wheels, which you might like.  I got my set delivered to Canada in approx 3 weeks.

This was a small set that doesn't require too much skill or time, but looks nice by itself or in a Lego style city.  I give it 4.5 stars.  If it had printed tiles instead of stickers, it would have gotten 5 stars.

Well, that's it!  Hope you enjoyed this review of the Sembo 601111 News stand.   See you next time!