Tuesday, July 28, 2020

Jerac's Tie Bomber MOC 13952 Knockoff Review - Part One


Intro


Hello and welcome back to Its-Not-Lego blog!  Today I'll be sharing my build pictures of the MOC 13952 Tie Bomber.  The version I have is the knock off model found on sites Aliexpress and Vonado.  Honestly, I don't know what the brand of this model is, but if you search Aliexpress for MOC 13952, it will show up.

The original model was created by Lego enthusiast Jerac  back in March 2018, so if you want all the background and details on this cool model, just Google "Jerac's Tie Bomber".

TL;DR


If you just want the quick details, here it is:

    Model: MOC 13952 Jerac's Tie Bomber
    Set Number: N/A
    Number of pieces: 1494+
    Number of minifigures: 0
    Fake Lego?  No.
    Missing Parts: N/ Deformed pieces: N/ Scratched pieces: N
    #itsnotlego Rating:  3 out of 5 stars.  This set is for advanced builders only and has a lot of finicky parts held together by a single stud.  The model falls apart easily due to a combination of quirky construction techniques and possibly bricks that don't clutch as well as original Lego. I would have given this model 5 stars because the look and feel is so awesome, but I had to deduct 1 point for the design of some of the elements and another point for poor brick clutch on critical pieces.


The Build


My Tie Bomber set came packaged with 11 ziplock bags of parts. They were numbered but didn't correspond to any of the build steps.  Regarding the instructions, you can get them online in PDF format through BrickVault.


Instructions were fairly straight forward except that each step doesn't really highlight where to place the parts, so you have to examine the steps closely.   What follows is a sequence of pics I took during the build.

Building the crossbeam that connects the wings, the cockpit and bomber bay.


Rotated so you can see the details on the back.

Rotated back to the front side.

View from the rear. The bomber and cockpit fuselages start to take shape.  So far, so good.  You can see that pieces will be attached in several orientations.  Everything is nice and solid to this point.

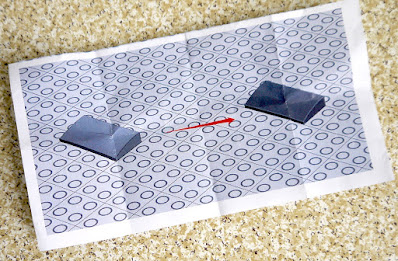
This sheet was included in one of the parts bags. It looks like at the last minute, the blue gray curved panels were being replaced by dark gray.  I don't know why the knock off set couldn't include the correct pieces here but this was a big disappointment.  Fail #1.

I ended up ordering the light gray curved pieces from Aliexpress. When they arrive I will replace the ugly looking dark gray pieces.

In the original instructions, I believe there's supposed to be two printed control panels in the cockpit, however the knockoff set doesn't come with those parts so I just substituted 2 grill pieces for now.  I might have some printed control panels in my brick stash, but too lazy to look for them at the moment.

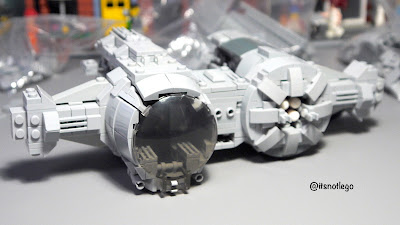
The knock off set gives you a 6x6 trans black round windscreen instead of a printed cockpit screen. The installation of the slanted cowling pieces and the corner fins around the windscreen give it a nice tapering effect except that the bottom clip wouldn't clutch to the rest of the body, so the windscreen kept falling off.  Fail #2.

The rear corner fins added as well as top and bottom plates.  These corner fins fall off at the slightest touch as they are just held in place by a clip to t-joint.  Fail #3.

Both fuselages take shape after remaining side panels have been added.  Now working on the center struts for the wings.  I substituted a spare 6x6 round piece from the Sanctum Santorum roof in lieu of the plane glass, just for fun.

Wings starting to take shape.  They become very solid once you get the bricks snapped into place.

This is the bottom view.  Those corner fins just won't stay in place.  Not sure if this is a design issue or a clutch issue.

Wings completed.  The triangular pieces within the wing panels kept falling out since they were only held in place by a stud brick.  Fail #4. 

The Conclusion?


At this point, every time I handled the Tie Bomber, one piece or another would fall off.   What would you do?  Would you glue the loose pieces?  Throw it at the wall?  Or try to fix the deficiencies?   Leave your comments below!  Cliffhanger ending!   Find out what happened in my next post, coming tomorrow!  See ya!


Please let me know if you had any issues with your non-branded Jerac's Tie Bomber and how you fixed them in the comment box below!


Saturday, June 27, 2020

Zhe Gao QL0935 Hill Tavern (Not Lego) Set Review


Hello brick fans!  Welcome back to Its Not Lego, where I review the latest Lego alternative building sets.  Today, I'm going to show you this new modular building from the Zhe Gao brand.   It's a three storey building called the Hill Tavern. This will be my first Zhe Gao branded set, and I'm excited to see what the quality is like, so let's go!

TL:DR


Here's the synopsis, if you just want the details for the set.


    Model: Zhe Gao Hill Tavern
    Set Number: QL0935
    Number of pieces: 1367+
    Number of minifigures: 3
    Fake Lego?  No.
    Missing Parts: N/ Deformed pieces: N/ Scratched pieces: N
    #itsnotlego Rating:  4 out of 5 stars.  The set is good value for the price but the minifigures are not Lego standard, and there are a few bricks with clutch problems.


The Instruction Manual and Sticker Sheet

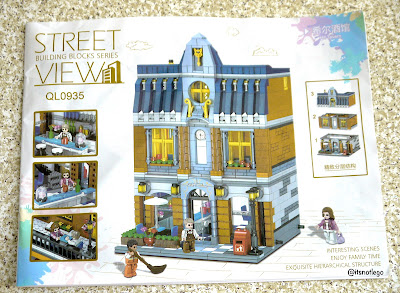
The Hill Tavern's instruction manual has 46 pages.  Mine was all wrinkly and has seen better days.   Here's the front and back covers and the first page.

The Hill Tavern is part of Zhe Gao's Street View series.  The set number is listed on the manual as QL0935 but there's no piece count.

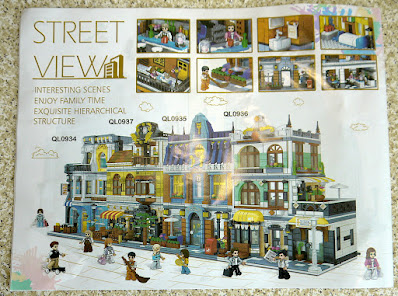
On the back page of the manual, it shows you the three other modular buildings that make up the Zhe Gao Street View series.  I looked up the set codes and these are the other Street View modulars pictured:

QL0934 Coffee Store
QL0935 Hill Tavern, that's the one we are reviewing today
QL0936 Rome Restaurant
QL0937 Chinese Restaurant


As you can see from the manual, there are 4 stages to the build process and there are  a total of 4 bags of parts for the set.

Here's the small sticker sheet for the Hill Tavern, which I didn't use.

The Minifigures


This Zhe Gao set comes with three minifigures, two guys and one girl.  There's one guy that looks like he works behind the counter of the Tavern.  His apron is more suited for a coffee house than a bar, don't you think?  The other male minifigure looks to be some kind of delivery person.  It's interesting to note that his skin colour is different than the other 2 minifigures.  Finally there's the female minifigure who has a really high forehead.  There are two accessory pieces which are a brown broom/mop and a lavender purse.


The minifigs are a unique design and do not follow the Lego standard so they won't be compatible with the rest of my city minifigures.  They have lots of ball joints and pose really well for extra play value.  Lego style minifigs don't have this kind of flexibility.

This is how a Zhe Gao minifigure looks before assembly.  There's an internal skeleton that has three ball joints.  It goes inside the torso piece and then that gets attached to the hip joint.  The legs are then attached to the hip ball joints.  The arms have a ball joint at the elbow and wrist.  The minifigure's head and hairpiece looks like it might be compatible with Lego friends. There's a total of 13 pieces that make up a Zhe Gao minifigure.

The Build


This is how the package looks like with the mailing sleeve removed.  As noted previously, there are 4 stages to the build so let's proceed with stage 1.


These 8 bags will build the first floor foundation of the Hill Tavern.


A progress picture of from stage 1.  The main floor is fully tiled which is a nice bonus.  The orange brown headlight bricks have very little clutch and are the worst pieces in this set.  The remainder of bricks have decent clutch and not scuffed. The window glass is just a bit hazy.   Let's move on to stage 2 now.


The stage 2 build completes the main floor with 10 bags of parts.

Some nice exterior details include the 4 carriage lights, and a small fenced off patio seating area with umbrella.  The street light is black and there's a mailbox or trash can next to it.  The contrasting sand blue and white tiling gives a nice contrast to the orange brown brick facade of the tavern.


Here's the interior of the main floor.  Navy blue and white tiles adorn the floor.  The bar area has 2 stools with eye catching turquoise blue countertop.  Other features include cabinet and drawer storage and a small cooler and a plethora of  bottles, cups and glasses.  The delivery guy is having a drink at the table.   I'm glad that the design of the building includes a staircase to the second floor.

 Please note that there is no back wall in the design of this modular.  To facilitate picture taking I've removed the support beams.

Stage 3 consists of 9 or 10 bags of parts to build the Hill Tavern's second floor.

Second floor front facade.  Yellow window frames are nicely contrasted to the orange brown bricks and sand blue accents.  I think the center white portion is mismatched and doesn't really complement the rest of the building.


The second floor interior consists of a large stairwell with sideboard and separate bedroom.   In addition to the bed, there's a floor lamp, a bookshelf, and desk and chair.   Zhe Gao is quite generous with the small accessories as evidenced by the extra mugs and bottle.

The second floor layout has a lot of wasted space that could have been put to better use.


I forgot to mention that there's a sink mirror and towel inside the bedroom.  It would be easy to reconfigure the second floor to provide a full 3 piece bath.

Here's the completed first and second floors of the Hill Tavern.

The view from the rear  so far.


The fourth and final stage begins.  It will build the third floor rooftop terrace.


The top floor of the Hill Tavern sports a very spacious terrace with seating for two and a small flower bed.  A light stand and flower pot complete the accessories. 

Enjoy the rest of the pics!


Well that's a wrap for today.  What did you think of the Zhe Gao Hill Tavern modular building?   This was my first Zhe Gao branded not Lego set.  Do you have this or the other buildings in this series?  How were they to build? Did you have a favorite? Let me know in the comments below!   See you next time, Bye!

Update (Feb 2021):  

Thanks for making it this far!  In the following months after this post, I turned the Hill Tavern into a full modular building and fully furnished the interiors of every floor.

Here are the subsequent posts specifically about the Zhe Gao Hill Tavern.  Enjoy!

1. A look at the original set          <--- you are here

2. Modular conversion         

3. First floor furnished

4. Second floor furnished        

5. Third Floor furnished

6. Bonus Pics (coming soon!)