Tuesday, August 1, 2017

Bela 10541 Not Lego Emma's House Friends Set Review

I wasn't planning on buying the Bela brand 10541 Emma's House building set.  But then I saw the set being sold on Aliexpress for half off it's normal Aliexpress price (which is like half price of Lego's price), so I couldn't resist.  This set comes with three Friends style mini figures and has 731 pieces.


The set comes packaged in several bags and includes a glossy instruction manual in booklet form.  Emma's House comes as a two level sectional building.  I don't want to call it a modular because it doesn't fit with the other Lego type modular buildings.


You get two 16x32 green base plates to construct the building on.  Here's one of the lower levels completed.  The front entrance features an arched entrance with a stepping stone path leading to the front door.  The original front door was dark pink, but I've replaced it with a different door.   There is a creeping flower vine on one side the house and a water tap and bucket on the other side.  You also get an entrance light and what looks to be a keypad.


So that was the outside of the house, now let's look at the inside.  We have what appears to be a living room setup, with a couch, a coffee table with planter and a big screen TV.


The other lower level sectional features a large window with a mailbox, small picket fence and fire hydrant.  I put a small tree there, but I don't think it comes with the set.   There is also  a small platform used to setup a painting easel.


When we look at the inside of this sectional unit, we find a kitchen and dining room complete with seating for three.  A free standing light fixture is one of the other furnishings.  In the kitchen, you get a hand mixer located on top of the oven.


Here's the outside of the second floor.  I like these windows and wish they would use them on more of the modular buildings.


Oops, we caught Harley Quinn in the bathroom, let's not look too closely at the makeup counter, flush toilet and big spa tub.


Over on the other side of the building, is an outdoor balcony with sliding door on the second floor.


If we come back inside from the upstairs balcony, there is a bedroom with a desk and bed.


I think I put this second floor section on the wrong first floor section. Oh well, I guess you're supposed to change them anyway you want.


Oh wait, I almost forgot about the rooftop deck, where there is a small table and stool.  Hmm, I smell dinner cooking on the BBQ.   The rooftop patio is surrounded by glass and has great views of Lepin Town.


Here's the assembled Bela Emma's House, front view.


And here's the back of Emma's House.

In case you were wondering what the Bela Friends minifigs look like, here they are.  I don't know their names, but if you are a Friends fan, you probably already know.


Emma's House comes with other accessories including  painter's easel, a bird bath and a flowering tree too.   The Bela brick and build quality is comparable to Lego's, and I didn't have any missing parts.  The future of this Emma's House in my collection is uncertain.  Either I will tear it down for parts or I might try to rebuild it in modular style.  What would you do?  Tear it down or rebuild it?

Brand:   Bela
Series: Friends
Model: 10541 Emma's House
Bootleg?  Yes, copy of Lego Emma's House 41095).

Saturday, July 1, 2017

How I Fixed My Lepin 05053 Not Lego Republic Dropship with AT-OT


Hi! Welcome back to Its-Not-Lego.blogspot.com.  Belated Happy Star Wars day!  I was going to post this article on May the Fourth (Star Wars day), but I've been so busy/lazy I put it off until today. 

Anyways, I'm sure you have already seen quite a few reviews on the internet about the Lepin Star Plan Republic Dropship with AT-OT set 05053.  It's a fake copy of the same named Lego Star Wars set 10195.  From what I've read from the other reviews, there were numerous problems with parts coming drooping and coming off everywhere on this set.


I just got my Dropship set from Aliexpress last month, so instead of doing my regular review of this bootleg set, I thought I would let you know what I did to fix the problems instead.  Of course, I'll still be showing you how the build progressed in pictures.

So my set Lepin Dropship/AT-OT set came in a large cardboard box that got left at my front door by DHL (yay!  no duties this time!).   Packed tightly inside were lots of un-numbered bags of parts and a thick instruction manual.  The large sticker sheet that came with the set was taped inside the instruction manual.  It's still there, as I chose not to use any of the stickers.  BTW, I heard from other reviews that they're not all that great, so just as well.


Remember, that as I'm set building, I'm always on the lookout to see where I can substitute a new brick piece with some old or off-coloured brick I have in my spare stash.  Well, I managed to hide a couple of pieces inside the frame of the AT-OT walker.  


The AT-OT frame is sturdy enough but the back ramp needs to be fixed.  Firstly it's too steep for the clone troopers to ascend.  I would attach a ladder piece to the ramp so that they can get a foothold.


Secondly, whenever you bend it, one of the pieces comes off where the triangular plate meets the black rectangular plate.  My solution would be to make the base of the folding ramp entirely out of technic pieces, so that the current technic brick is hinged to another technic brick that would be attached underneath the black plate piece .  I have a design in mind, but don't currently have the pieces I need at the moment.


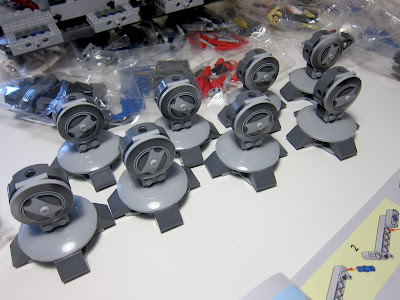
The next gripe I have is about the AT-OT walker lower legs which won't stay attached.  They keep coming loose and the legs just fall off.  I think it's design issue, in that the technic pin that holds the lower leg in place are too short to make a good insertion into the printed round plate.


My simple fix to this problem was to turn the technic pin around and insert it from outside in.  Then to secure it, you use a yellow technic bolt.  The printed plate sits nicely onto top of the reversed technic pin and it doesn't come off.


Here's how the legs look now.  They don't fall off anymore.


Another leg issue I had was the cylinder brick on the upper legs would fall off.  To fix this problem, I attached a light gray 1x3 plate across the two sides of the upper leg.


Sometimes the round feet would come off as well.  To rectify this, I added 5 extra 2x2 plates to each of the feet and this seemed to resolved my problem.  Note: you'll need a total of 40 pieces (5x 8 feet) if you plan on doing this too.


The remainder of the build was problem free until .....


... we got to the AT-OT cockpit.  I'm guessing the Lego fit and finish of the cockpit canopy glass had better tolerances than the Lepin canopy.  Whenever I went to flip the canopy open, inevitable the glass would come off the two black pivot pieces, because they were basically being held by 2 connection points and they were just too loose.  I'm surprised that no other Lepin dropship reviews indicated this was a problem, because this really bothered me.


I used three brick parts to fix this issue. One 1x3 finish plate, one 1x3 straight plate, and one 1x2 single stud.


Attach them altogether and place into the canopy like so.


Now, re-attach the canopy to the black pivots.  I now have 4 connection points instead of two and it holds the canopy glass in place quite securely.


Oh, one more nit I had (geez, I'm so anal!).  I didn't like that the cockpit canopy roof wasn't really secured.  I slightly redesigned the canopy roof and added a 1x2 stud piece as pictured below.


When you place the clamp down, it basically locks the cockpit canopy in place.


So as I finish building the AT-OT, the final issue is of course the droopy turret guns in the rear.  You'll notice that mine don't droop at all.


This was the simplest fix of all.  I simply ripped up some of the bags that the parts came in and shoved them into the ball socket.  I didn't trim them yet so you could see what I did.  Basically it gives some friction so that the turret ball won't move inside the socket, then you can freely position the guns as you wish.  And they will stay in place.


Ok, that was a really long post.  I'll wrap this up for now and in my next blog post, we will look at the assembling the Lepin dropship and fix whatever issues we find there.


Oh btw, I recall I had one or two missing pieces but they were fairly common plates or something, so I just scrounged up the replacement parts and continued building.  Nothing significant to hinder the progress of the build to this point.   Thanks for looking!!   Part Two coming soon.

Monday, May 1, 2017

One of the Best Lego Blogs on the Planet!


Wow, how cool is that?  It's Not Lego blog made the Feedspot Best Lego Blogs List!


Read all about it here:


We rank #26 out of the top 50 Lego blogs.   Should we tell them our blog is about fake Lego?   

Nah.