Friday, October 9, 2020

Jie Star 20543 Fish Farm By The Sea (Not Lego) Set Review


Hello and welcome back to Its Not Lego, my blog about alternative Lego sets.  If you'd like to see my latest MOCs and minifigures, please also check out my other blog called https://BricksandFigs.blogspot.com.

Today, I will be reviewing one of my older building block sets, it's called the Fish Farm By The Sea, set number is 20543. It's from a lesser known brick company called Jie Star.  I think their focus is more on smaller vehicles and some military sets, so this particular set might be a departure from what they normally produce.

There are 447 pieces to this set, which consists of the parts shown above.  Although the set is called Fish Farm By The Sea, it's more of a fishing shack.  This set is a unique design for Jie Star and isn't a Lego set clone.

This set includes four Lego style minifigures pictured above plus one dog.  There's a lady in a business suit, two younger guys with baseball caps and an older guy with gray hair and mustache.  The quality of the minifigures is very good, although I would have liked to see some craggy old fishermen type minifigures for this set.

Quality wise, the bricks in this set are pretty good and so is the clutch.  Colour consistency is also very good.  If there's one complaint I have it is that the baseplate provided is only 16x28 studs, not the standard 16x32 studs.  I don't know why Jie Star just didn't use a standard baseplate. 


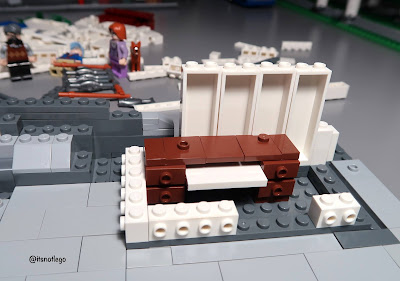
The footprint of the shack isn't that large, but there's a large desk that dominates the inside.  A smaller table and a chair would probably have been a more appropriate interior.  As it is, it's standing room only. 


Just about completed the shack and added a table lamp and speaker to the desk.  Outside is a rack that you can hang your daily catch onto.  On the other side is a stone wall with some weeds growing in.

And here is the completed shack and pier!  Extra accessories include some oil drums and a small stool.

But wait, there's more!  There's a cool looking diesel generator, a small watercraft, a few extra crates and a fishing rod included in the set.

Here's a better look at the fish rack.

And the generator.

Sorry, doggy, no room for you in the boat.

Doggy, you want fish?

Check out my catch today!


So my rating for this Jie Star set is 4.5 out of 5 stars.  The set is a fun little build and there's a generous amount of minifigures for this set.  As mentioned previously, brick clutch, colour consistency is good and you get quite a few accessories for play value.

I deducted small marks for the non standard baseplate and the cramped interior.  I bought this set from Aliexpress back in February 2019, but I could only find one store that carries the set right now.

Saturday, September 19, 2020

Decool 2113 Bell Boeing V-22 Building Set Review (Not Lego)

Hello and welcome back to Its-Not-Lego, my blog that reviews the good and bad of Lego knockoffs and alternate brick brands.  In this post, we will be taking a detailed look at the Bell Boeing V-22 tilt motor airplane building set.

TL;DR


Here's the quick details:

    Model: Bell Boeing V-22
    Set Number: Decool 2113
    Number of pieces: 318+
    Number of minifigures: 5
    Fake Lego?  No.
    Missing Parts: Y/ Deformed pieces: N/ Scratched pieces: N
    #itsnotlego Rating:  3 out of 5 stars.  I wish the plane was bigger.


Intro


I bought my set from Aliexpress in late July and received it about a month later.  There are 9 bags of parts, of which 5 bags belong to the minifigures.  When I ordered the 318 piece set, there was no indication that 5 minifigures were included, so this was a bonus.

The instruction booklet has 47 pages and 44 steps.  According to the front and back covers of the Decool manual, this V-22 aircraft is part of the Modern War series.  Other sets in this series include what looks to be like a Hummer, a troop carrier and a helicopter.  It looks like you can supplement the sets with additional minifigures that are sold separately.


Here are the 5 minifigures you get with the set.  There are 4 soldiers decked out with vests and camo pants.  There's one figure who has a black helmet and vest so I will assume he's the V-22 pilot.  Each minifigure comes with several weapons including rifles, pistols and knives.  I should point out that the legs don't clutch very well to the torsos on any of the minifigures.  I will probably add a dab of glue to keep them in place.

The Build


Ok, let's start building!  Although there are number bags for the parts, they don't correspond to the build steps, so I just unpacked all the parts into a pile and then sorted them by colour, more or less.


The aircraft fuselage consists of a cockpit with printed control panel. There are some additional windows on the side, but the rest of the interior is quite small.  There's rear hatch but I don't think I can actually fit the other minifigures through it. Brick clutch is good though.  I would like to be able to extend the fuselage and make it taller so the minifigures will fit inside, but not sure how to do it yet.

With the fuselage completed, it's time to focus on building the wings.

Here's the progress so far.  Got the wings attached to the body and also have the 
landing gear attached.


Here's a quick peek at the aft section of the plane.


Assembling the tilt motors.


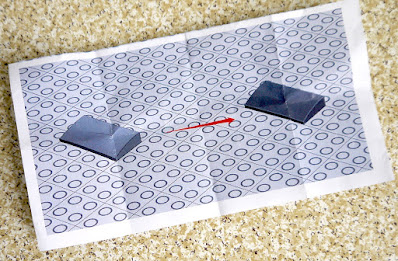
So I ended up getting two plates the same, but they are supposed to be mirrors of each other, so I can't fit it into one of the engines. I don't have a piece like this in my stash, so I'll just leave it off for now.

Here's the engines attached to the wings.

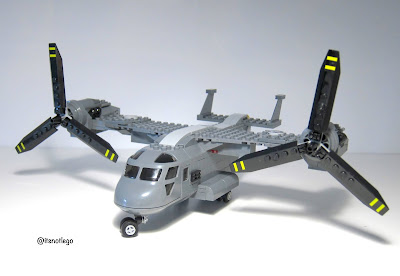
Pictured with propellers facing forward.

And with the propellers in upright position.  The tilting is simply performed by clicking the hinges up or down.


These are the extra pieces leftover after the build.

Final Pictures and Thoughts


So, in conclusion, I thought this was an ok build.  The Decool tilt motor V-22 model is based on Lego's Cargo Heliplane set 60021, but the colour scheme has been changed to dark gray to reflect it's military purpose.  

Play value is acceptable with opening hatch and cockpit and tilting motors. The plane is very swooshable with very good brick clutch for the plane but not so good for the minifigures.  The minifigures are quite detailed and you get a lot of accessories with them. I find the plane rather small and not proportioned to minifigure scale, hence me giving it a rating of 3 out of 5 stars.


What did you think of this set?  Do you agree or disagree with my rating?  Please feel free to leave your comments below!  Thanks for visiting and see you in my next post. Bye for now!

Update!

The knockoff of the 1636 piece Lego technic version of the V-22 Osprey is showing up on Aliexpress.  This is the version which Lego cancelled.


Tuesday, July 28, 2020

Jerac's Tie Bomber MOC 13952 Knockoff Review - Part One


Intro


Hello and welcome back to Its-Not-Lego blog!  Today I'll be sharing my build pictures of the MOC 13952 Tie Bomber.  The version I have is the knock off model found on sites Aliexpress and Vonado.  Honestly, I don't know what the brand of this model is, but if you search Aliexpress for MOC 13952, it will show up.

The original model was created by Lego enthusiast Jerac  back in March 2018, so if you want all the background and details on this cool model, just Google "Jerac's Tie Bomber".

TL;DR


If you just want the quick details, here it is:

    Model: MOC 13952 Jerac's Tie Bomber
    Set Number: N/A
    Number of pieces: 1494+
    Number of minifigures: 0
    Fake Lego?  No.
    Missing Parts: N/ Deformed pieces: N/ Scratched pieces: N
    #itsnotlego Rating:  3 out of 5 stars.  This set is for advanced builders only and has a lot of finicky parts held together by a single stud.  The model falls apart easily due to a combination of quirky construction techniques and possibly bricks that don't clutch as well as original Lego. I would have given this model 5 stars because the look and feel is so awesome, but I had to deduct 1 point for the design of some of the elements and another point for poor brick clutch on critical pieces.


The Build


My Tie Bomber set came packaged with 11 ziplock bags of parts. They were numbered but didn't correspond to any of the build steps.  Regarding the instructions, you can get them online in PDF format through BrickVault.


Instructions were fairly straight forward except that each step doesn't really highlight where to place the parts, so you have to examine the steps closely.   What follows is a sequence of pics I took during the build.

Building the crossbeam that connects the wings, the cockpit and bomber bay.


Rotated so you can see the details on the back.

Rotated back to the front side.

View from the rear. The bomber and cockpit fuselages start to take shape.  So far, so good.  You can see that pieces will be attached in several orientations.  Everything is nice and solid to this point.

This sheet was included in one of the parts bags. It looks like at the last minute, the blue gray curved panels were being replaced by dark gray.  I don't know why the knock off set couldn't include the correct pieces here but this was a big disappointment.  Fail #1.

I ended up ordering the light gray curved pieces from Aliexpress. When they arrive I will replace the ugly looking dark gray pieces.

In the original instructions, I believe there's supposed to be two printed control panels in the cockpit, however the knockoff set doesn't come with those parts so I just substituted 2 grill pieces for now.  I might have some printed control panels in my brick stash, but too lazy to look for them at the moment.

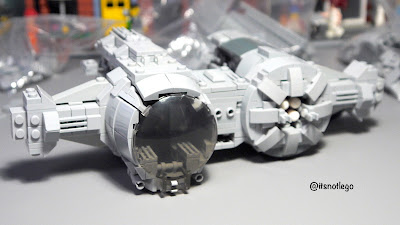
The knock off set gives you a 6x6 trans black round windscreen instead of a printed cockpit screen. The installation of the slanted cowling pieces and the corner fins around the windscreen give it a nice tapering effect except that the bottom clip wouldn't clutch to the rest of the body, so the windscreen kept falling off.  Fail #2.

The rear corner fins added as well as top and bottom plates.  These corner fins fall off at the slightest touch as they are just held in place by a clip to t-joint.  Fail #3.

Both fuselages take shape after remaining side panels have been added.  Now working on the center struts for the wings.  I substituted a spare 6x6 round piece from the Sanctum Santorum roof in lieu of the plane glass, just for fun.

Wings starting to take shape.  They become very solid once you get the bricks snapped into place.

This is the bottom view.  Those corner fins just won't stay in place.  Not sure if this is a design issue or a clutch issue.

Wings completed.  The triangular pieces within the wing panels kept falling out since they were only held in place by a stud brick.  Fail #4. 

The Conclusion?


At this point, every time I handled the Tie Bomber, one piece or another would fall off.   What would you do?  Would you glue the loose pieces?  Throw it at the wall?  Or try to fix the deficiencies?   Leave your comments below!  Cliffhanger ending!   Find out what happened in my next post, coming tomorrow!  See ya!


Please let me know if you had any issues with your non-branded Jerac's Tie Bomber and how you fixed them in the comment box below!