Sunday, February 26, 2023

Today's Review: JMBricklayer 20104 Botanical Collection Succulent Flower Set


Welcome back to It's Not Lego, my blog where I review the latest Lego compatible building block sets.  Today I'm reviewing the 20104 9 pack Succulent set, the latest in a series of botanical building block sets from JMBricklayer.  

Thanks to JMBricklayer for providing the building set for this review!

This appealing succulent set can be found on their the JMBricklayer website or from their Amazon shop if you like it.  Sets come with free worldwide shipping.  Check out their website for more details.  Also don't forget to check out JMBricklayer's latest promotion and contests!

Use my discount code "itsnotlego15%" to save on applicable purchases from the website.

At a glance

Brand: JMBricklayer

Set: 20104 Succulent Set (9 different plants)

Theme: Botanical Collection

Piece count:  750 pieces

Numbered bags? No

Stickers or printed parts? No

Missing or deformed pieces: No

Extra parts: Yes

Minifigures: No

Lighting kit: No

Brick Quality and Clutch: Excellent

Measurements (approx): N/A

Age Rating: 14+


Unboxing

Here is the colourful box for the JMBricklayer's succulent collection.

Inside the box, it is jam packed with a total of 10 bags of parts and a package of separate instruction sheets to build 9 different succulent plants.  There are a total of 750 pieces in this set.

There is one bag of parts and a two sided instruction page for each of the 9 plants. The turquoise coloured plant also uses the extra bag of small flowers.


Here are all nine of the succulent plants completed.  Each succulent plant comes with a unique shaped planter.   They were easy to assemble and look great by themselves, in smaller groups or displayed all together.   All the flower parts clutch together very well and the quality of the pieces used is excellent. I really like all the colours and flower types.  

For the research for this blog post, I learned the names of some of the succulents, such as Haworthia, Echeveria, Graptopetalum, and Sedum to name a few.  I think flower #1 looks like a sedum, flower #5 looks like echeveria, and graptopetalum might be flower #7, and haworthia - flower #3.  If you know more about succulents, please let me know what the other flowers are called and whether I got them right or not.

There's a small handful of parts leftover afterwards.

I like them all but if I had to choose, I think the leafy green plant (pictured top left) looks the most realistic. The pink flower succulent (pictured top center) is also another favourite of mine.  


In conclusion, it was very satisfying to build these little representations of succulent plants.  They make a very nice display for your home decor.  They are small enough to not take up too much space on your desk or table but still add a pop of colour and vibrancy to your indoor space.  Best of all you don't have to maintain any of these lifelike plants.  

Here's my entire JMBricklayer botanical collection.  If you missed my other reviews, you can find them below.

JMBricklayer 20106 White Orchid

My rating for this 9 pack JMBricklayer succulent set is 5 out of 5.  Please let me know what you think and whether you agree with my rating.  Thanks for visiting and see you next time, bye!

Wednesday, February 22, 2023

JMBricklayer 20106 Botanical Collection White Orchid Not Lego Set Review


Hi and welcome back to It's Not Lego, my blog that reviews all the latest building block sets coming out of China.  Last week, I reviewed the JMBricklayer Flower Bouquet set from their Botanical Collection/Home Decor theme.   Today, we will look at another set from that series, this time it's the 20106 White Butterfly Orchid.


Once again, JMBricklayer has provided this set for me to review, A big thank you!

The beautiful white orchid set can be found on their the JMBricklayer website or from their Amazon shop if you like it.  Most sets come with free worldwide shipping.  Check out their website for more details.  On sale right now!

Use my discount code "itsnotlego15%" to save on applicable purchases from the website.


Details

  • Brand: JMBricklayer
  • Set: White Orchid 20106
  • Theme: Botanical Collection/Home Decor
  • Piece count: 581 pieces
  • Numbered bags? N/A (not applicable)
  • Stickers or printed parts? None
  • Missing or deformed pieces: No
  • Extra parts: Yes
  • Minifigures: No
  • Lighting kit: No
  • Brick Quality and Clutch: Just one clutch issue, otherwise not bad
  • Measurements (approx): just under 12" H, approx 11" wide
  • Age Rating: 14+

Unboxing


JMBricklayer has departed from their black boxes with this new green box to showcase their floral line.  Although there are three coloured flowers depicted on the box, this set only includes the white orchid.  I think the same box is reused for each flower given that there are three different set numbers on the front  and side of the box.  


The white orchid is a smaller set with only 581 pieces and therefore divided up over 7 bags of parts.  Of those, one bag consists of about 120 1x1 round pieces that is used to represent the dirt inside the planter.  So I don't know if they count towards the total part count.  If they do, then the flower itself is made up of 461 pieces.


The bags are numbered with prefix JK29012, which, when I checked against brick4.com, indicates that this set is a re-pack of Jaki branded Plante theme.

Just an FYI, brick4.com is a database of sorts for Lego and not Lego building block sets.  I would say it's about 99% complete, with only a few sets missing from it's database.

Here's the instruction manual, that confirms my brick4.com findings.  The cover reads Plante de la Vie which translates to Plant of Life.  Using Google Translate, the Chinese captions read "Rotate the flowers arbitrarily" and "Moveable flower branches, move your posture as desired".


Here's a screen grab/google translate of the text I found on the inside cover of the manual.


There are a total of 44 pages in the instruction booklet, each step being clearly marked and easy to follow.

You basically have to open all of the bags to begin building.  I always find it's easier during the build process, if I've already sorted the parts by colour.


The white orchid set comes with this black brick built planter, which is the first thing to be constructed.


Now we are building some small flowers and leaves that will serve as decoration for the orchid.


Next to build are the stems of the orchid.  This actually looks pretty good the way it is.  I like that it looks like there are flowers in various stages of blooming.


There are two methods of attaching the orchid petals, one of which doesn't clutch as well as the other method (flower petals on the right side tend to fall off).  It would have made sense to just use the method on the left for each petal.

The flowers look nice, just have to be extra careful handling them because they are delicate, just like real flowers.


There are a total of 6 orchid flowers.  After attaching the flowers, the completed set is just under 12 inches tall.  I think it would have looked nicer if the stems were longer, making the flowers more upright.  For the soil pieces, I didn't use the entire bag, maybe only one third of the bag.


Here's the White Orchid and the Flower Bouquet pictured together.  I found the build to be not too challenging, making it an appropriate set for people who want to get started with Lego compatible sets.  I'm going to rate this set a 4.5 out of 5, taking marks away for the loose petals and the short stems.  Otherwise, the Orchid looks very nice on display for a table centerpiece or to liven up a boring room.

Let me know in the comments if you agree with my assessment or not.  That's it for now, bye!

Thursday, February 16, 2023

JMBricklayer 20109 Botanical Collection Flower Bouquet Review

Hello again, friends of the brick!  I'm making this post belatedly a little after Valentine's day, so hopefully it will still resonate with anyone who likes flowers and bricks.  Lego introduced their floral sets back in 2021 and I guess soon after the alternate brick brands followed suit, seeing that there was a market for these sets.

I checked brick4.com and there are several chinese building block brands making floral bouquets including Sembo, Panlos, Zhegao and Woma to name a few.  The set I'm going to review today is the artificial plants Flower Bouquet set 20109 from JMBricklayer's Botanical Collection or Home Decor line.  

At the time of this post, JMBricklayer has a total of seven different flower bouquet sets on their website.  And because it's February, they are having a promotion in their online store and in their Amazon store, right now!  Please check it out if this interests you.

Use my discount code "itsnotlego15%" to save on applicable purchases from the website.


Thank you again to JMBricklayer for sending me this floral bouquet set to review!  They thought it would be nice for everyone to see some flower building block sets during this special valentine season.  Let's now look at the set details


Details

  • Brand: JMBricklayer
  • Set: Flower Bouquet 20109
  • Theme: Botanical Collection/Home Decor
  • Piece count: 836 pieces
  • Numbered bags? Yes
  • Stickers or printed parts? None
  • Missing or deformed pieces: No
  • Extra parts: Yes
  • Minifigures: No
  • Lighting kit: No
  • Brick Quality and Clutch: Mostly decent
  • Measurements (approx): tallest flower is about 18" H, width varies
  • Age Rating: 14+


Unboxing

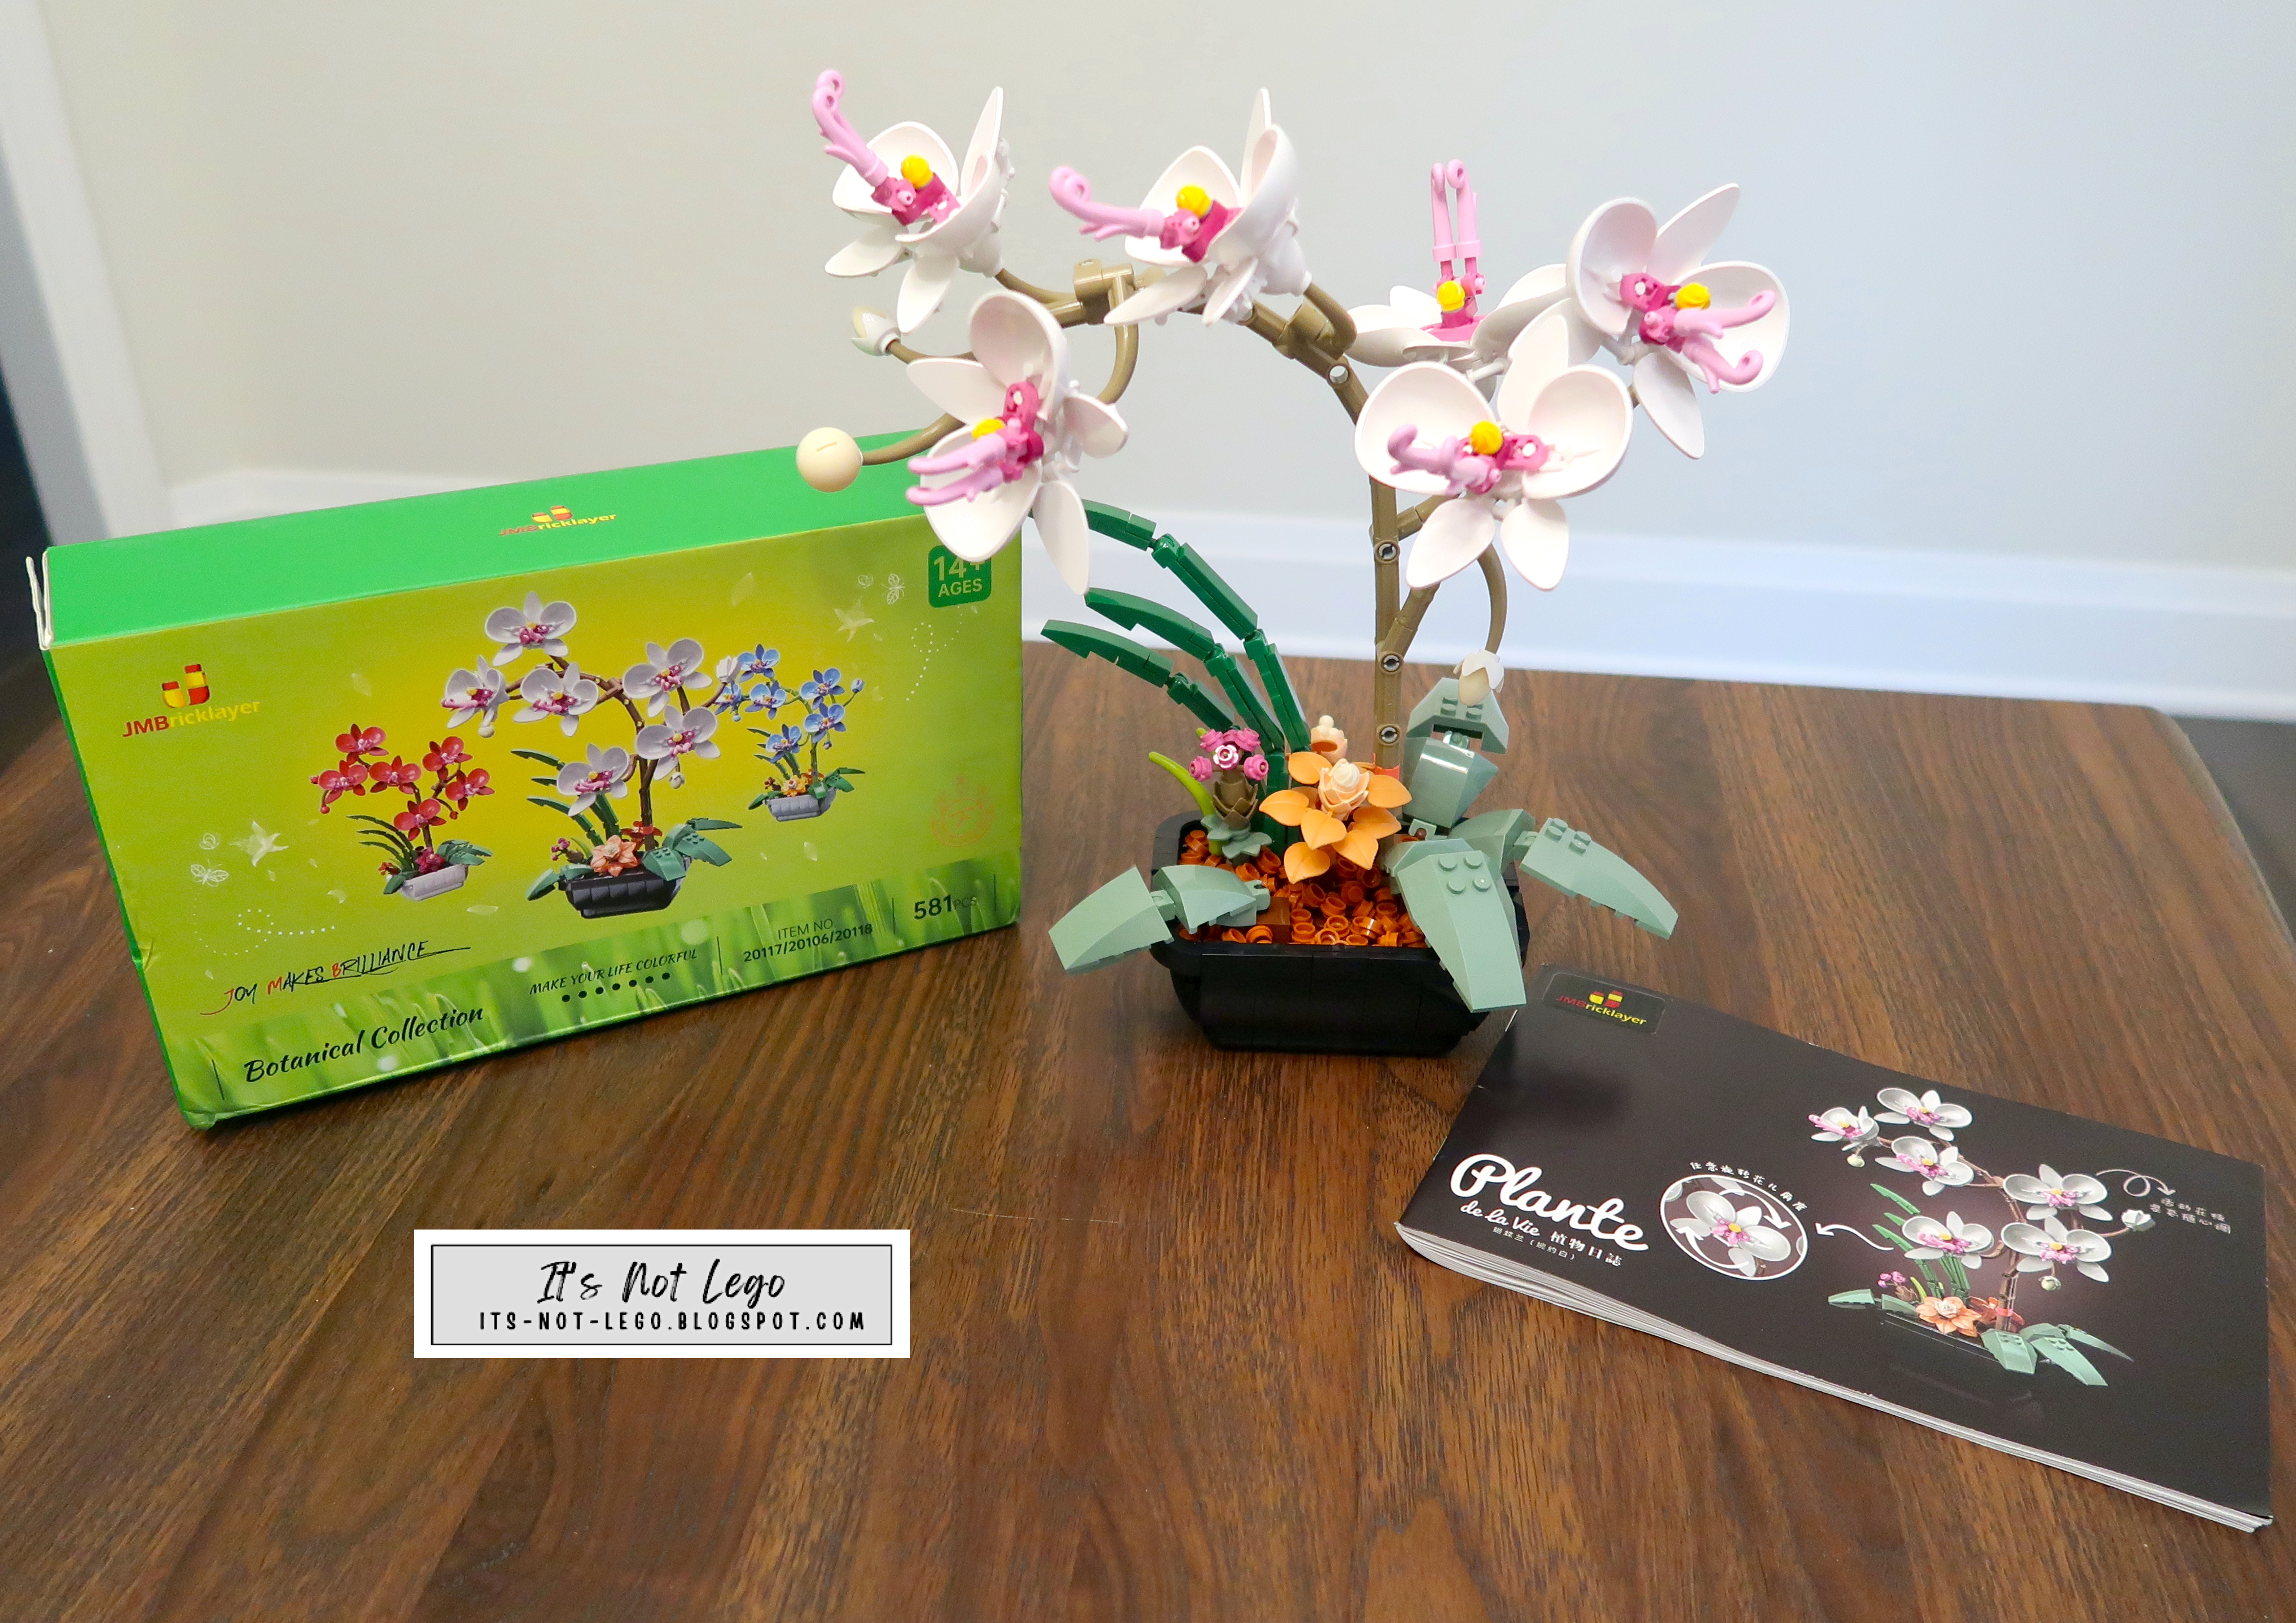
The Flower Bouquet set comes in a black box with the very nice image of the flower bouquet on the front.  Inside there are a total of 15 bags of parts, six bags numbered 1, and eight bags with the number 2 on them.  There's a last bag of pink parts all attached to sprues.

The instruction booklet contains 26 pages and is broken down into two sections which the bags of parts pertain to.  A note about the number on the instruction manual. It says 034004 which when I checked brick4.com is actually a set from the Mork brand, so like many other sets from JMBricklayer, the floral set is a repackaged version.

While there are no stickers in this set, there is a warning card included on how to reduce the stem height so that the flowers don't fall over.  The instructions are straightforward and easy to follow.


Building the Flowers


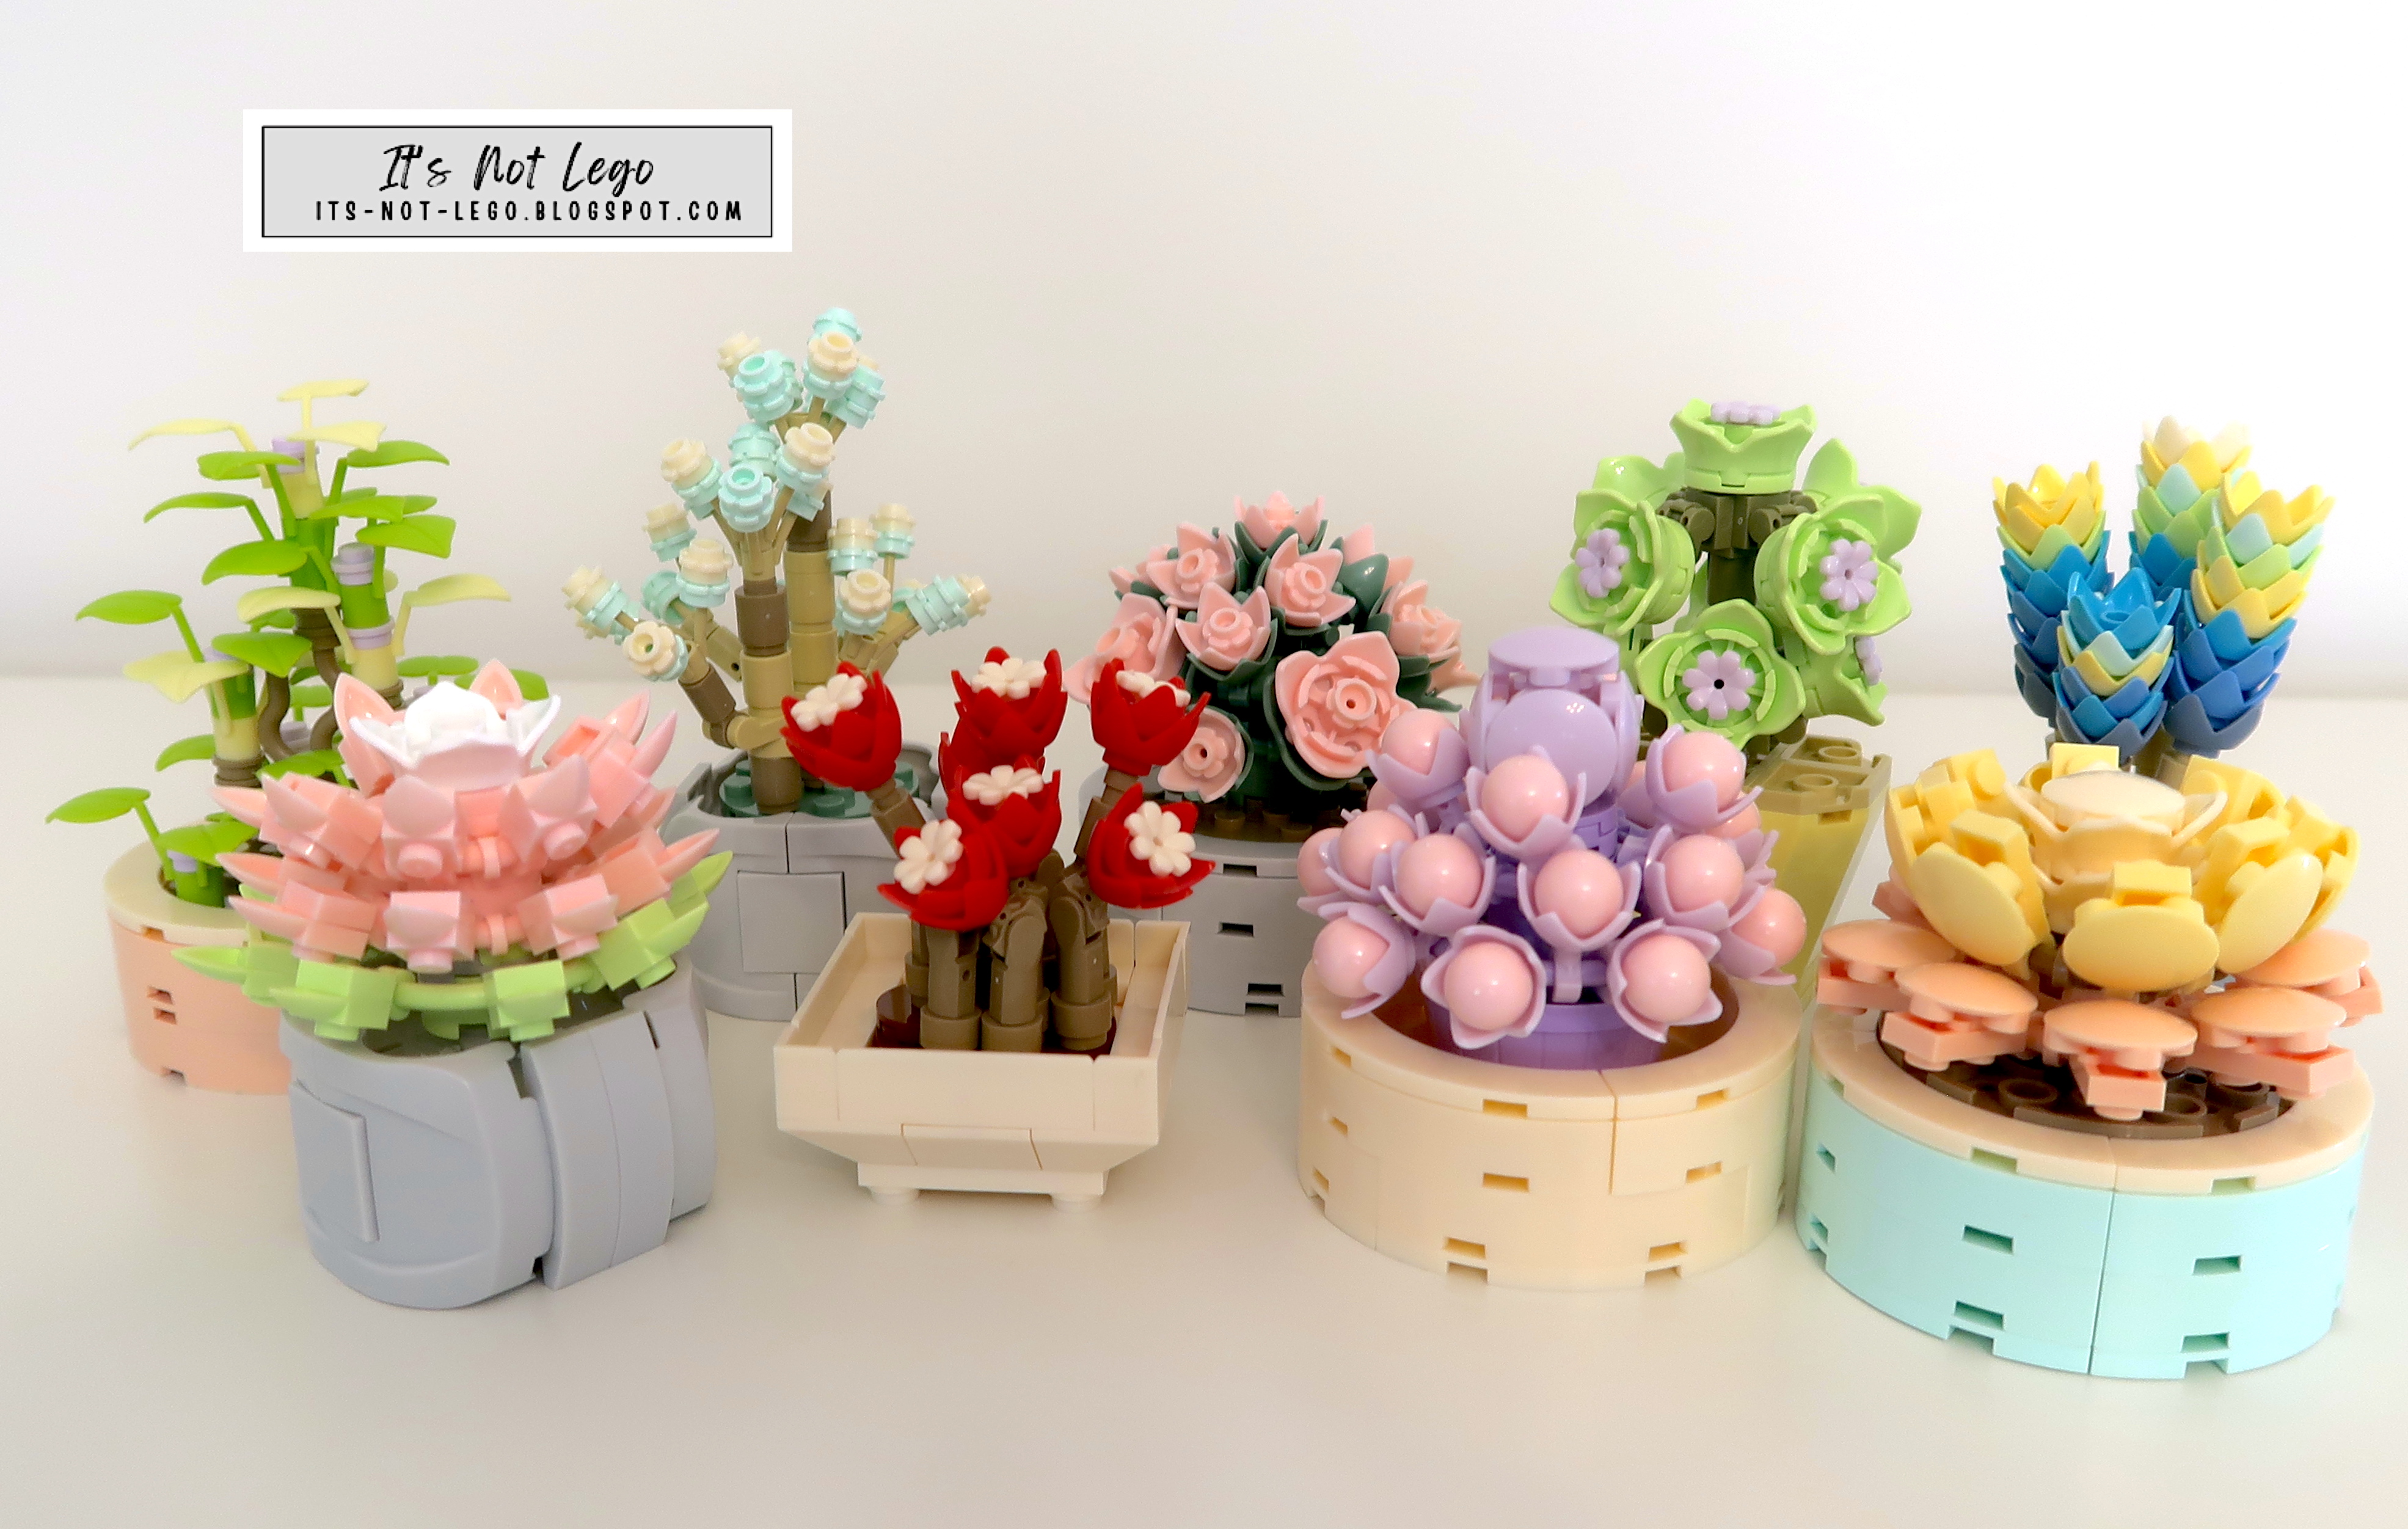
So in section 1, each bag pertains to a different flower, so we have built six different flowers pictured above.  Hope you can name them, because I don't know much about flower species.  As part of this section of the build, it also includes two different leaves.

I've never had much success with keeping plants alive, so these flowers will never need watering or any attention but will still look great wherever you put them.  Since I didn't have a vase at home, I used an old peanut butter jar and this silver can as my vase.  

I would highly recommend that you get a vase for this set, because it doesn't come with one.  Make sure the vase is tall enough, maybe at least 12" high or more because the next flowers that we build have longer stems.

For section 2, you build four unique flowers, but some are duplicated and some are just leaves.

In section 2, you get 1 big light green flower, 2 purple flowers, a plant that has lots of little pink flowers and one that looks like a weed, lol.  You also make some leaves here as well.  I forgot to take a picture of me using all those tiny pink flowers from sprues to make the plant shown on the left, but you get the idea.

This series of flowers are assembled with extra technic pins that makes the stem of each flower taller.  However, due to my small "vase", a lot of the flowers toppled over, so I had to reduce the stem height as per the included warning card.  If I had a taller vase, I probably wouldn't have to have done that.

A problem with the purple flowers


When I followed the instructions to build the purple flowers, the heads kept falling off the stem.  It was because the green pin was too short to hold the head in place. 

There are two longer yellow pins included in the set, but they don't tell you what they are for.  If you replace the shorter green pins with the longer yellow pins, the purple flower heads stay firmly attached.  I'm not sure if this fix was included in the original Mork set, or whether this is a new fix specific to the JMBricklayer set.  

I had a similar experience when building the JMBricklayer Vintage Car set.  The original Mould King branded set had some unplated pieces which were subsequently replaced in the newer JMBricklayer version of the set.


Finally, here are the extra pieces I had left over.  I might have leftover some pieces on the leave portions because they were already too tall. And I didn't add all of the stem portions (technic pins) for the same reason.


Pictured here and below are my rather pathetic attempts at flower arrangement.

Hopefully you can make your flower arrangements nicer looking than mine.

Summary


So this was my first time building a floral set and I think it turned out rather nice despite being a novice at it.  I think everyone, especially those new to Lego and building blocks could give this a go in case they are intimidated by the larger building block sets.  Instructions were clear and easy to follow, except that they didn't mention the fact that the purple flower heads needed the longer yellow pins.

Most the flower parts held up well, but some were a little floppy. This was more of a design issue than a clutch issue.  Surprisingly, I didn't have many pieces falling off  despite me moving and placing them several times to take pictures.

My biggest recommendation would be to use a real vase, not an old peanut butter jar to display these flowers. And make sure it's at least 12" or more in height.  I measured some of the flowers and leaves and they can be well over 18" tall if you included all the stem pieces.

From a brick perspective, I liked that the set used a lot of ingenious pieces, like snowboards, gears and scuba diving fins to make the flower petals and leaves.


Would definitely recommend this set to those with an interest in dabbling with Lego style bricks for their first time or enthusiasts who love plants and  flowers.  With 836 pieces, the set is sufficiently challenging and would make a nice rainy day build.

Here's the direct link to JMBricklayer Floral Bouquet set.

I give it 4.5 out of 5 for decent clutch, ingenuity in parts and the bright colour palette.  Hope you liked this review, see you next time!  Bye!

Wednesday, February 8, 2023

Reviewing the JMBricklayer 21101 Flower House Building Block Set


Welcome back to It's Not Lego!  Today we get to look at another set from JMBricklayer.com.  It's the colourful 21101 Flower Shop!  It comes with LED lighting and 1593 pieces.  It can even be opened up fully to display the interesting and packed interior.


Where to Get it


Today's set was generously provided to me by JMBricklayer.com for the purpose of the review.  


You can find this set and many more on their website.  Use my code ITSNOTLEGO15% to save 15% off on selected items.  And they offer free worldwide shipping to most countries.

Set Details

  • Brand: JMBricklayer
  • Set: Flower Shop 21101
  • Theme: City Architecture
  • Piece count: 1593 pieces
  • Numbered bags? Yes
  • Stickers or printed parts? Both
  • Missing or deformed pieces: No
  • Extra parts: Yes
  • Minifigures: No
  • Lighting kit: included
  • Brick Quality and Clutch: Great
  • Measurements (approx): 8"W x 6" D x 7.5" H
  • Age Rating: 14+

Unboxing


My Flower Shop came in the original JMBricklayer box, which was jammed packed with multiple parts bags and the instruction booklet.  The first thing I noticed was the manual which listed the set number as 031061.  A quick check on the internet reveals the JMBricklayer set is a repack of the Mork 031061 Flower Shop set.  

Also included in the box is an easy to follow instruction manual consisting of 102 pages. I found a very small sticker sheet taped inside the manual, but I forgot to take pictures of the two stickers.

There are three steps to building the flower shop, broken down in the manual as follows:

Step 1 - pages 1 thru 27
Step 2 - pages 28 thru 61
Step 3 - pages 62 thru 100


Corresponding to each step are also numbered bags of parts. Total number of parts bags is 30 broken down as follows

Step 1 - 11 bags
Step 2 - 9 bags
Step 3 - 8 bags

Plus 1 bag for the led light string and 1 bag for the flower/decorative pieces.

Building Step 1


Step 1 builds one side of the flower shop which includes half of the base, one set of  walls and part of the shop interior.  Instead of using one or two larger baseplates for the floor, the designer opted for a lot of smaller plates which surprisingly held the shop together adequately later.

Found this parts bag in Step 1 with a strange message reading "All use of this white accessories, to this package shall prevail".   The bag contained the extra pieces pictured above which weren't needed at all to build the flower shop.  Weird!

Ok, this is what 11 bags of parts all opened looks like.  Let's build!

Baseplate and plant stand under construction.  And before you know it ...

... the first step is completed!  In addition to the plant stand which is now adorned with lots of greenery, there is a shelf, maybe it's a resource centre?  The flower shop gets a patterned yellow and blue floor which is surrounded by walls of several glass windows.  

The assembled door gives us the indication that the flower shop is not minifigure scale.  That's too bad.  I think the flower shop owner has neglected the plants because all of the flower heads are drooping.  Water them please!


Here's the exterior for this part of the build.

On to Step 2


Cracking open all of the bags numbered 2.

Here's a couple of nice printed tiles I found amongst the other parts.

Here's the other baseplate being constructed.


Building up the remaining walls and interior. A potted plant shelf sits next to the counter.  I discovered a couple of more printed pieces in the form of little QR codes sitting on the countertop.

Those printed tiles look like pictures that are for sale.  They sit on a small cart which has a floor fan in front of it.

The last walls of windows are built to complete Step 2.

In order to line up the small 1x1 tile pieces that form the walkway around the flower shop, I found it really helpful to use some tweezers for straightening all of the tiny parts, especially the light gray pieces which clutched a tad too much.

Final Step


Unpacking the bags for Step 3, which constructs the flower shop roof and adds all of the other little bits around the exterior.


Here's what one of the roof panels looks like during it's construction.


Of particular note one should be aware of, is that the instructions seem to miss adding a thin circular plate to the middle of the center cylinder.  The part is provided, just not mentioned.  Make sure to add this piece otherwise the pegs that clip to the center beam may not line up.

Before I show you the finished flower shop, here are all the extra pieces leftover.  Note, I didn't use any of the optional flower and insect pieces from the sprues as per the instructions.  Oh BTW, there's that tiny sticker sheet in the picture.  I didn't apply the stickers either.  We will look at the LED light string in just a bit.

For now, let's view the completed flower shop from the outside.  There are two access doors that can open and close.

Lots and lots of windows!

As mentioned earlier, the interior of flower shop can be displayed by opening the swivel base.

Here's another way to display the set.

Now, let's look athe lighting for the Flower shop.  There's no place to attach the lighting cables so looks like it's just freeform ...

... as per the instructions.

Wow, check out the effect of the lighting!


The flower shop definitely looks nicer with the lights on.

Finally, here's a quick comparison photo of the JMBricklayer Flower shop displayed next to the Mork 031063 Ecological Park set, which I also reviewed last December.  Both of the sets are very similar in size.  In fact, the sets almost look like they have been designed by the same person.

Summary


I think the JMBricklayer Flower Shop shines best when displayed with the lighting kit on (excuse the pun!).  It's a nice looking display model with lots of glass area.  I feel like it could have used a few more flowers on the inside, and I wish the shop was scaled more towards minifigures.  Danboard thinks that the scale of the shop is just fine.


With a few interior adjustments, I'm sure one could mod it, however the front and back doors would definitely need to be replaced for minifig scale.  One might wonder if there's too much white colour going on with this building.  Since the flower shop had printed some pieces, I'm not sure why they didn't just make the two stickers printed pieces as well.  

On a scale of 1 to 5, I'm going to rate this set 4.1.   My score would have been higher if the flower shop was minifig scale and had a few more flowers.  Let me know what you thought of this set in the comments below!

Thanks again JMBricklayer.com for the set.  Please visit their website if you get a chance. Bye for now!