Hey brick fans! Ready to build something epic? Today, we’re diving into a set that’s sure to bring out the master builder in you! This unique Travel Trailer by FUNWHOLE is something totally different than my other builds!
A big thanks to FUNWHOLE for providing this set to me for purposes of review! FUNWHOLE is a Lego compatible bricks brand, that incorporates lighting in every single one of their sets. Their motto is bringing Delight Day and Night. Their signature name celebrates the union of “FUN” and “WHOLE” which equates to a lot of happiness all the time! They've been making a lot of amazing looking sets so you will have to visit their website and see the huge selection of building block sets they have there.
So let's take a look at this newest set! We will provide a quick summary, followed by unboxing and building while reviewing all of the neat features. Let's go!
Features: include multi-component light kit and battery pack, building tools such as brick separator and tweezers, numbered parts bags, and best of all printed parts, no stickers!
Look for the limited time offers available right now!
Unboxing
The FUNWHOLE Travel Trailer came shipped in a sturdy box and the artwork on the box cover looks fantastic. Every FUNWHOLE set comes in these boxes which I reuse afterwards to store my extra brick parts.
Upon opening the box, you will get a lot of goodies, such as a thick instruction booklet, tons of parts bags and a separate box which is the mainstay of every Funwhole building block set, the lighting kit. The light kit is what sets FUNWHOLE apart from Lego and all of the other competing brick brands.
Inside the light kit box, we have a set of metal tweezers, a battery box and two pouches.
The pouches contain the lighting components which will be added to the travel trailer set during construction. In this set there is a USB connector, a yellow 4 port expansion slot, several dot lights, and a wireless connector setup.
The instruction guide is very easy to follow and the part descriptions are clear and concise.
Travel Trailer set construction
Alright let's build! There are a total of 8 steps to build the travel trailer. The parts bags all have numbers that correspond to each step making it easy to find the right pieces to use.
For step 1, we get three bags of parts.
Step 1 builds the colourful base of the travel trailer.
Moving on to step 2, we can get 2 bags.
Here's the progress after step 2.
Here's 4 bags of parts used in step 3.
In step 3, we are building some of the interior furnishings such as the cabinets, the bed and sofa. You can see that in this step we have incorporated some of the lighting features.
Moving on to step 4, we will use 3 bags of parts.
The travel trailer gets some appliances like a fridge and microwave, and a door to the bathroom. The postcards and travel magazines are all printed pieces! That's another unique feature in that FUNWHOLE prefers printed parts over stickers.
We use another 3 bags for step 5.
The travel trailer is really starting to take shape in this step! We installed a lot of windows on every side and the yellow and orange colour scheme looks very nice!
There are just 2 bags for step 6.
Step 6 finishes off the bottom of the trailer and we attached the wheels and hidden battery pack underneath. Note: The battery pack uses 3 AA batteries which are not included.
We also finish the back wall which can be easily removed to see the bathroom. The air conditioning unit, spare tire and the ladder to the roof all look very realistic.
Step 7 uses 2 bags of parts.
Yup, we building the roof of the travel trailer! It's equipped with skylights and solar panels and lots of room for rooftop storage.
On the final step 8, we have 2 bags of parts numbered 8 plus an extra bag that contains the awning fabric and poles.
The awning can be rolled out for those wanting some shade.
This travel trailer is destined for the beach because of the two surfboards! To relax, there are two folding camp chairs, a portable table. For a quick bite, you can have hot dogs or pizza, and to keep busy and entertained, there is a small replica box of the FUNWHOLE camper set that comes with the signature lighting kit box too!
For those with a bigger appetite, the trailer comes equipped with a large barbecue stove, cooler, and assorted drinks and condiments. And musical tunes are provided by the radio!
e
The Travel Trailer looks so cool, it's too bad I don't live close to a beach, or I'd definitely bring it there and take pictures of it on location!
Here are some more views of this home away from home.
With the awning rolled up, and all the accessories packed away, it's time to hit the highway!
I believe this is a power generator and propane tank for the barbecue.
Extra storage.
Awning rolled up.
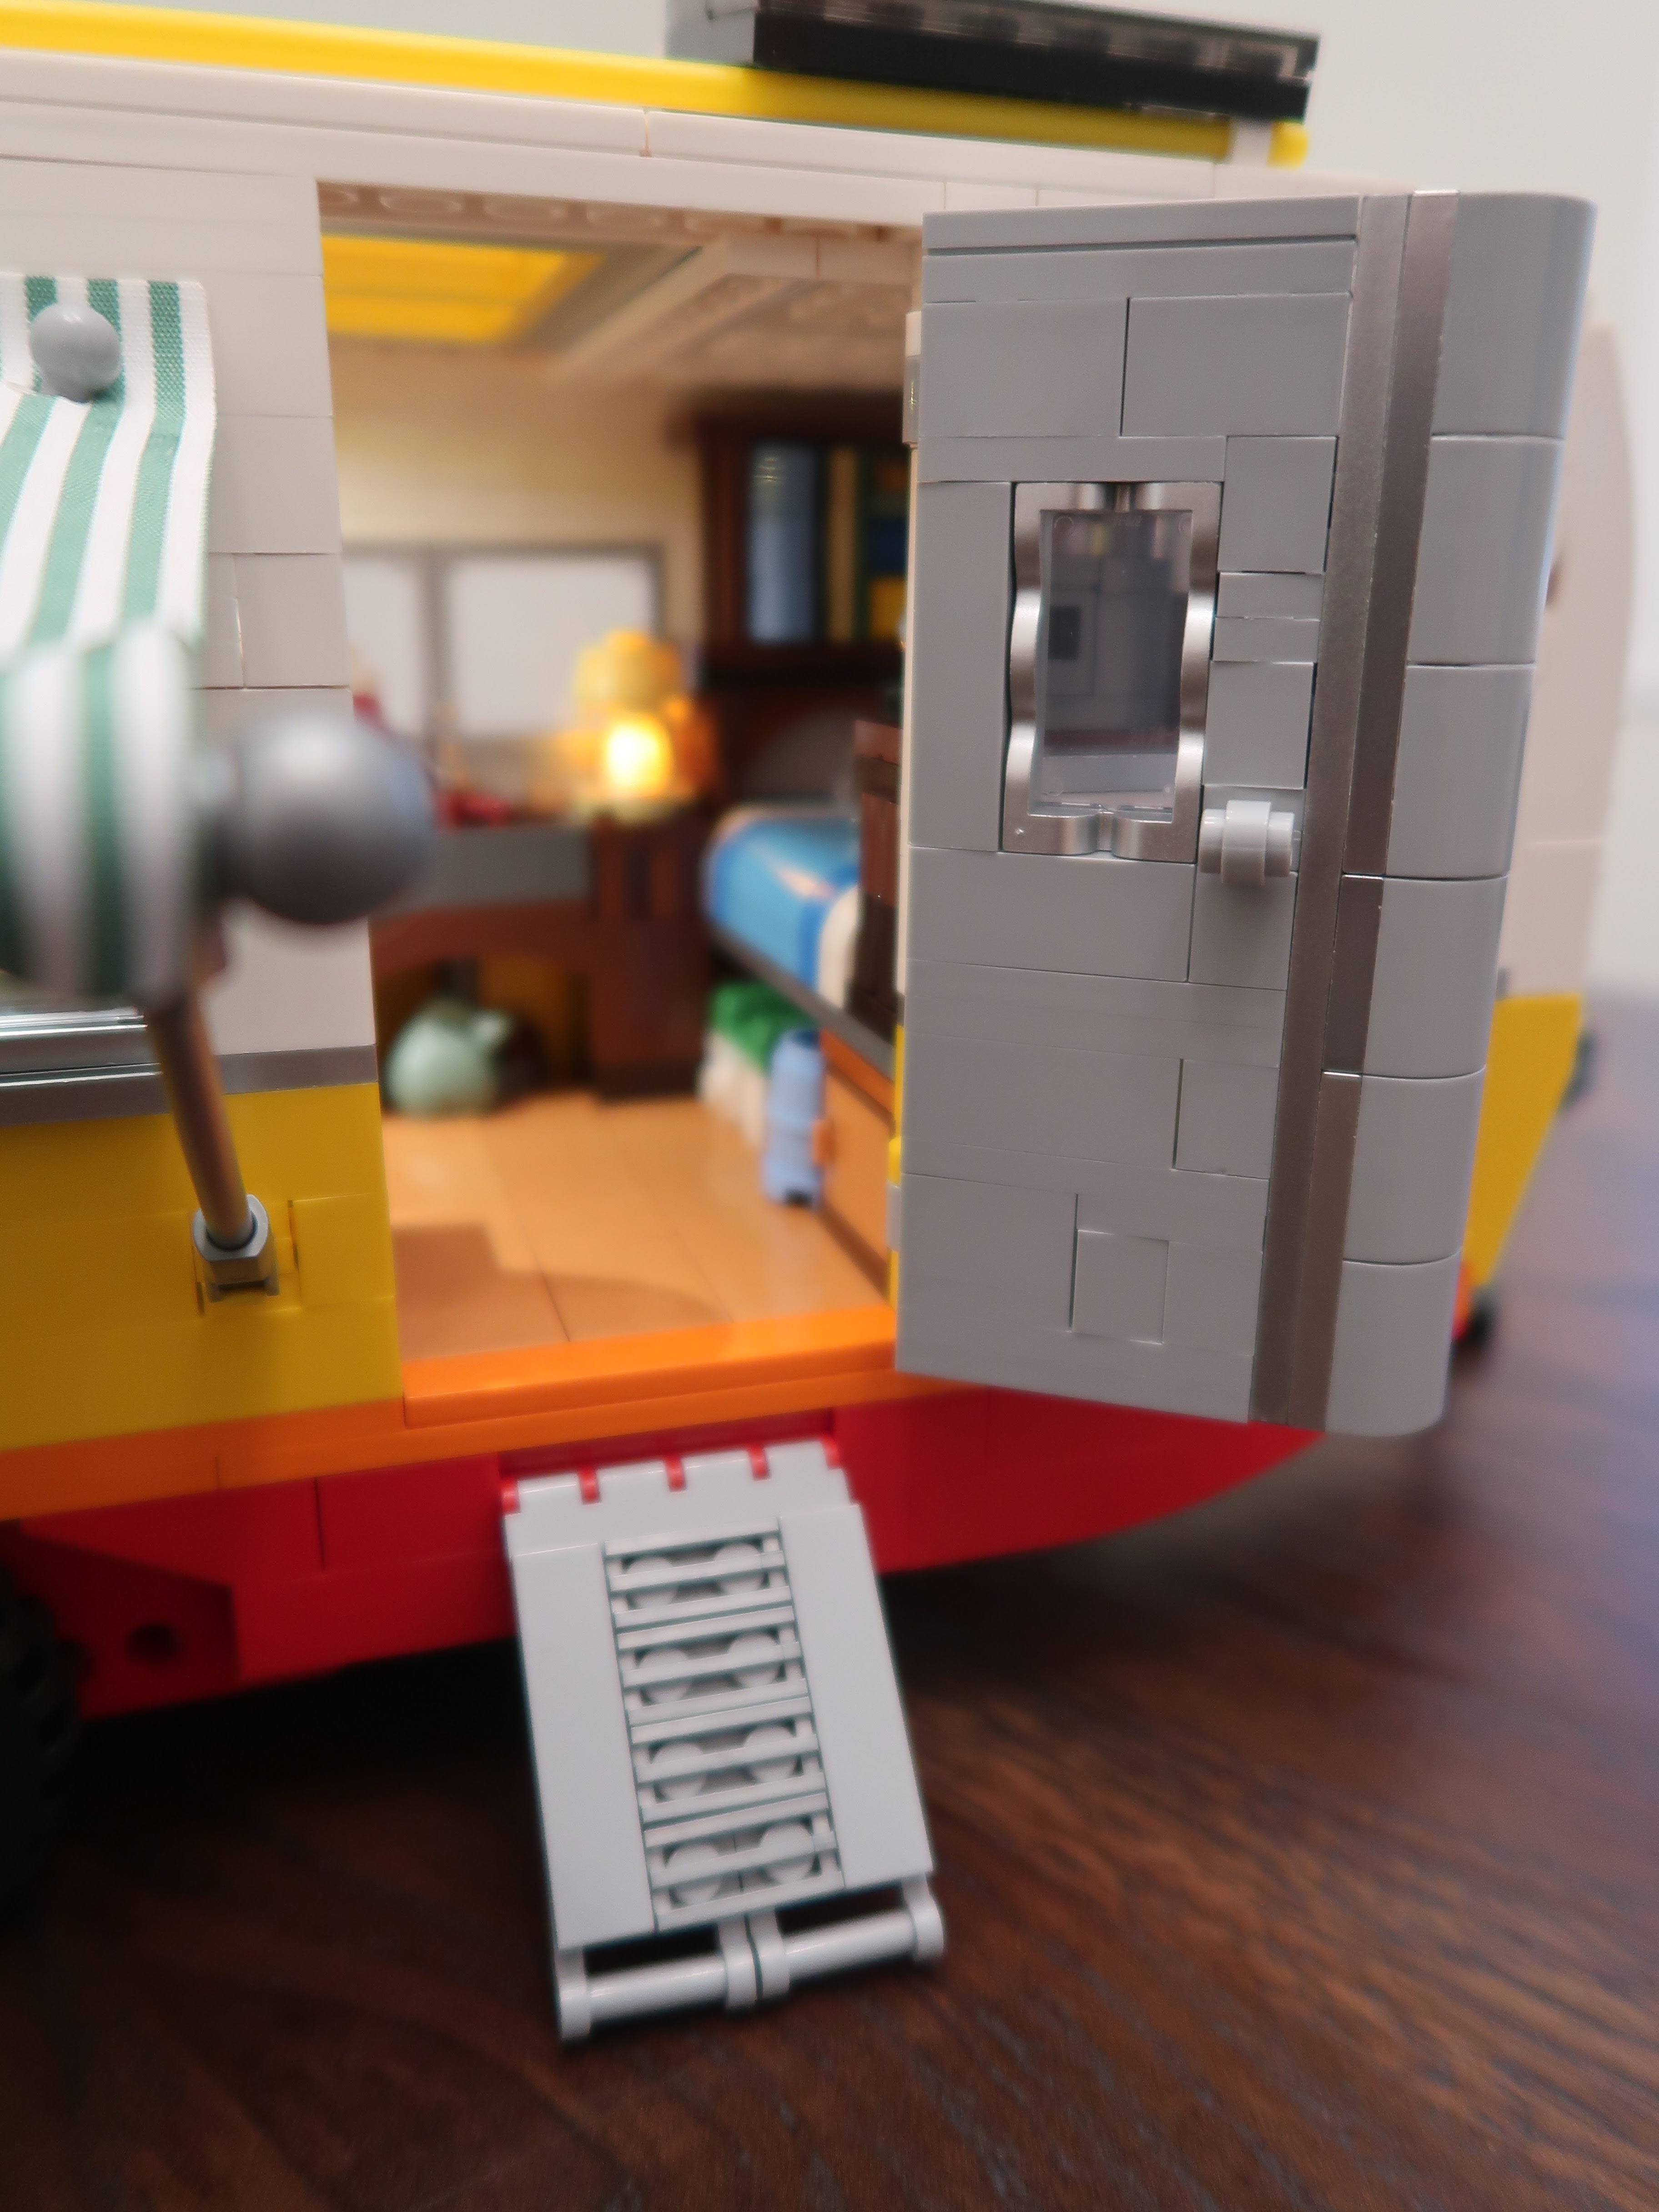
Now that we've checked out the exterior, let's go up the ramp and see the interior!
Access to the interior is made easy by removing the roof and back panel.
Let's check out the living quarters! With lots of storage space, keeping the inside tidy is a breeze!
I love the fridge and microwave with lighting inside! Printed pieces on the cabinet!
Moving along, we get a coffee maker, a sink and a table lamp that lights up!
A comfy bed and a bookshelf and place to store the radio and of course the little FUNWHOLE set! Gotta have a camera to capture all those vacation pics. Hey, I told you a million times, don't leave your pizza on the bed!
The bed is removable so you can stow the barbecue, the cooler and other storage items underneath. A very efficient use of space!
A sofa and cushion bring the creature comforts from home. I forgot to take a picture but that little brown side table with the flower has extra hotdog weiners inside!
At the rear of the trailer, the bathroom contains a towel bar with towels, a toilet, a cabinet with mirror, and a showerhead on the back wall.
But let's not forget what FUNWHOLE is all about, it's the lighting!
Check out the warm glow coming from inside the trailer.
Even the bathroom is lit up!
Final Thoughts
FUNWHOLE did a great job of replicating a Travel Trailer! This makes a wonderful display to remind you of all those past beach vacations. The lighting kit adds an extra ambience at night. There were so many cool accessories that came with this set, and I especially loved the little FUNWHOLE replica set of the camper. This is a big set and I wished that it was possible to shrink the trailer down to minifigure size, but I know that they'd probably have to reduce the amount of accessories to make it fit the scale I want.
Now I just need an equivalent sized vehicle to pull the camper! Got any recommendations?
Check out the FUNWHOLE site to see all of the latest brick sets with lighting included!
Thanks for checking out this review, hope you found it helpful, Until next time, bye!
Hey brick fans, we are back to show you some of the exciting features of the JMBricklayer Steampunk Dinosaur Marble run. We will then talk about some of the tips and tricks I found that helped me get the most enjoyment from the set.
A huge thank you to JMBricklayer for providing me with an advance copy of the Marble Run set to build and preview.
As I mentioned in my previous blog post set review, the Marble Run set is definitely a challenging set and is meant for expert builders. If you are new to Lego compatible sets or marble runs, make sure you have someone help you out and be sure to follow the instructions properly to get the most satisfaction from the set. Don't get discouraged, just keep at it and you will be rewarded with all the fun and excitement watching the marbles make their way around .
In case you missed the other parts of my JMBricklayer 70003 Marble Run reviews, you can find them here:
It's not on the JMBricklayer website yet, but is available at a discount through the Kickstarter program which indicates that sets will ship starting in August 2024.
So here are some tips that you may find useful during your build. I also point out some of the tricks I used to help me with building the marble run. Ok, let's go!
Tip #1
Review the instruction manual first and understand the placement of all the features such as the dinosaur platform, the storage tanks, the chemical tanks, etc. Failure to place the elements in the correct location may impact future steps and item placement down the road.
Tip #2
Take your time and don't rush. This is a complex set and it has many, many steps. It took me about two to three weeks off and on to build the set, and then about another week to perform functional and marble testing. If you run into problems, take a breather and come back and look at it on another day.
Tip #3
Test as you build. Once you have the battery and motor attached together, check their operation because if these don't work, you have no marble run. If you encounter any problems with either the battery pack or the motors be sure to reach out to JMBricklayer support. My understanding is that thy will send you replacements for missing or defective parts.
Tip #4
Use new batteries. The included battery box uses 6 AA batteries which are not provided. It's extremely important that you use new batteries, because old batteries will not have enough juice to power both motors. In fact, during the course of my building and testing, I had to replace my first set of new batteries with another set of 6. So make sure you have new batteries at your disposal. Maybe one day, JMBricklayer can make the set powered by an external power source such as USB or whatnot.
Tip #5
The moving dinosaur steps. There are two sets of the and they are driven by gears and cams underneath the steps. They are driven by one of the motors. The other motor will be dedicated to operating the tower lifts. After you have constructed each of the moving steps, try running them by placing a ball at one end and see if the marbles move from one end to the other. I messed up the placement of the cams on one of my steps and had to take it apart and redo it to get it working right.
Tip #6
The two elevator lifts. I can't stress enough how vital these two elevators are to the set. One is like a tractor chain that lifts the marbles up the tower. It is constructed in stage 4 (pages 125 through 160 of manual A) and it's important that his runs smoothly. Any friction will cause the corresponding gears to seize up and stop. Testing consists of making sure the chain runs smoothly, however we cannot run any marbles up it at the moment.
Regarding the corkscrew elevator, the base of it has a collection area for the marbles (as shown on page 118, of instruction manual A). The bottom is constructed of 3 parts, a 6x10 plate, a 2x10 plate and a 1x10 plate. In the instructions, the 6x10 plate is at the front and the 1x10 is at the back. I found that it collapses when I try to apply pressure to the structure in steps 3-60 and 3-61.
My trick:
To mitigate this problem, rotate this part so that the 1x10 is on the front and the 6x10 is on the back. This will make it sturdier when building up the cage that sits over the base.
The corkscrew elevator is constructed in Manual B, Stage 5 (pages 221 through 224) and requires special attention when winding the hose around the central stem. The transparent green shaft (stage 5-40) and the gold tile wall are what guides the marbles up the corkscrew. Once you have built and attached the green tower, try putting a marble in the base and see if it makes it's way up the corkscrew. You might have to hold the central stem of the corkscrew straight to make it work.
Tip #7
The track holders. The track holders and the long brown hoses are what make up the tracks for the marble run. You should position the clamps so that they make a consistent width of track for the marble to run. If you position them too close together or too far apart, the marble will fall off the track. You will be building a lot of them for the set, so make sure you make them the same for each one.
My trick:
I found that it was sometimes difficult to keep the clamps in place, especially when trying to force them into the holes of the technic arms. Some of them would pop off just as I was installing them with the hoses. My solution was to stick technic pins into the holes and attach the back side of the track holders to them instead of the front.
If you have some of these smaller technic pins, see how I inserted them into the technic arms. Now you attach the track holders to the pins instead of trying to force them into the holes of the technic arms. These are the type of technic pins I'm talking about.
You don't have to do it everywhere, only for those parts where the clamps don't stay in place. Of course, this solution will only work if you have some of those small technic pins in your parts bin to use.
Tip #8
Most of stage 6 will involve the installation of the track for the marble run. The instruction manual provides exact measurements for both the rails of the track. There is an inside and outside rail and the most times, they are not the same length. There are four different lengths of hoses, so make sure you use the right ones when cutting.
My trick:
Ok, here's where I cheated. Instead of checking the manual each time and measuring the tracks and cutting, I simply attached the hoses in the place where they need to be installed and cut in place. I found I could move much more quickly doing it this way, but if this seems difficult for you, stick to the instructions in the manual.
Laying of the marble run track starts on page 274 in Manual B, stage 6. The sequence of events starts with step 6-18 and working to 6-48 on page 304. The instructions essentially start laying the track from bottom to top. There were some parts of the instructions where I could not tell where to connect the tracks, being that they were on the bottom, I found it slightly disorienting.
I stopped and went back over the steps to lay the track, and here's what I did.
My trick:
I started laying track from the top to bottom. Here is the somewhat reversed sequence of track laying I used for my Marble run that allowed me to visualize how the track would flow downwards:
By doing this I could run a marble down each segment of the track as I laid it and troubleshoot it's ability to stay on the track and adjust the track as needed.
Tip #8
Guardrails. Sometimes no matter how you adjust the track, the marbles just won't go where you want them to. This is especially true when they are coming out of the top of the elevator lift or coming out of the lava tunnel. They just shoot out past the track.
My trick:
I had lots of extra leftover brown hoses after installing the track. I figured I could put it to good use by making some guard rails at problem points throughout the track, like at the aforementioned exit points and when tracks did a sharp curve. Just cut some of the hoses to the length you need and use the extra clips and clip hem to the track.
Here's a guardrail I added when the marbles exit the dinosaur pit.
Here's multiple guardrails I added where the marbles exit one of the dinosaur steps and feed into the base of the corkscrew tower lift.
I added a guardrail at the mouth of the corkscrew lift.
There are many more, such as exiting the orange lava tunnels, and the exiting the dinosaur body. Just add them where ever you need them.
Tip #9
There are two cranes that you build and perch on top of the upper platforms. The cranes work really well and they will hold the load of pipes, but the weight of the pipes causes the crane to topple off the platform.
My trick:
I added 2 pieces of 2x6 blocks as a sandwich layer between the cranes and the platform. By providing the extra clutch needed, and positioning the balance point slightly off the platform, the cranes stayed firmly in place.
Tip #10
Balls, balls, everywhere! It's inevitable that no matter how well you build the marble run, some of the marbles will fall off. I started to collect them but had nowhere to put them.
My trick:
To solve this dilemma, I made a container out of spare bricks and attached it to the marble run technic frame, close to the top of the lava tunnel. This made it easy to consolidate the marbles, whenever I had to retrieve them, and putting them near the entrance to the lava tunnel seemed like the best location.
As mentioned earlier, there is a single motor that drives both of the marble lifts: the chain lift and the corkscrew lift. The shared gearing for both of these lifts also connects to a set of extra gears that turn but provide no other function other than cosmetic. In my case, the torque generated by having those extra set of gears attached, caused both of my elevators to slow down and stop during their operation of transporting multiple marbles in the lift.
My trick:
Pictured above are the gears that I'm referring to. I managed to pull this assembly off and disable the small gear on the other side of the grey U joint, thereby rendering these gears inoperable. By doing this, there was less stress caused to the elevator gearing and now the lifts work perfectly in my marble run!
In conclusion, I found the JMBricklayer Steampunk Dinosaur Marble Run set to be really amazing and challenging. It tested my patience at times, but the end result was worth it. I hope you found my tips and tricks to be helpful to address some of the minor issues I had when putting the set together. I can definitely recommend this set to anyone who is a fan of GBC marble run setups or just want an exciting and challenging building experience.
Don't forget to check out the JMBricklayer website and visit their Facebook and Instagram pages to participate in their promotions and monthly contests where you can win free sets and get exclusive discount codes up to 60% off. For the non sale sets, you can use my special discount code itsnotlego15% to save an extra 15% off.


 eThe Travel Trailer looks so cool, it's too bad I don't live close to a beach, or I'd definitely bring it there and take pictures of it on location!


 e
e