Showing posts sorted by relevance for query jmbricklayer. Sort by date Show all posts

Wednesday, October 25, 2023

What's in the Box? Revealing JMBricklayer's Newest Building Set, the Ghost Ship 40001


Ahoy mateys!  Here at It's Not Lego, it's high time to reveal JMBricklayer's newest building block set, the  Flying Dutchman Ghost Ship!

"The Flying Dutchman is a legendary ghost ship, allegedly never able to make port, but doomed to sail the seven seas forever. According to the legend, if hailed by another ship, the crew of the Flying Dutchman might try to send messages to land, or to people long dead. Reported sightings in the 19th and 20th centuries claimed that the ship glowed with a ghostly light. In ocean lore, the sight of this phantom ship functions as a portent of doom."  Wikipedia.


Thanks to JMBricklayer, we can relive the legendary tales, explore the enigmatic pirate seas, and embark on an adventure inspired by the Flying Dutchman ghost ship.  

You can find this legendary 1100 piece set on the JMBricklayer online store.
Use coupon code VIPLEGS15 which applies to all non-discounted products and offers a 15% discount. The code is valid until December 31, 2023. 

The Ghost Ship is also available on Amazon.com. https://www.amazon.com/gp/product/B0CC7X9ZS8.
Coupon code VIPLEEGA15 for US Amazon applies only to the non-discounted Ghost Ship 40001 and is valid for one month, offering a 15% discount.  

All JMBricklayer sets come with free shipping and free replacement parts in the unlikely event of missing pieces.  I've built several JMBricklayer sets and have not encountered a problem with missing pieces.

What's in the Box?

Here's a quick inventory of what's in the Flying Dutchman Ghost Ship set:


  • 14 bags of parts, numbered 1 through 4 including a bag for sails and rigging.
  • an easy to follow 63 page instruction booklet 
  • a pouch containing an LED lighting kit
  • two sticker sheets


The LED lighting kit includes 9 strings of green LED dot lights, a 12 port expansion board, and a USB connector cable.   You will need to provide your own USB power source because it is not included in the set.

Here's a look at the fabric sails, totalling seven in number and strings for rigging.  I did not use the rigging on my set, nor did I use the stickers, which I understand are glow in the dark.  My sails were creased and crumpled but not too bad.


There are four steps in the construction of the Flying Dutchman Ghost Ship.

Step 1 - The Hull


The ship's hull is built from 3 bags of parts.

A bonus brick separator tool is included in one of the bags.

The hull is a very straightforward build and this is where we install the first of many LED lights.

Pro tip!  It's a good idea to test each of the LED lights by plugging them into the expansion board before putting them into the set.  Don't forget to attach the USB plug to the expansion board and a power source.  I used a spare USB battery pack but you can use whatever is available to you.  Get in touch with JMBricklayer customer service if any of the LED lights are not working.

I tested the light successfully so here it is installed behind the cannons.

Step 2 - The Main Deck


Step 2 is comprised of three bags of parts.

I like to sort my parts by colour as you can see.

Another LED light is installed as per the instruction manual.

All of the LED wires are fed out through the stern of the ship.

Pro Tip! It's best to remove the rudder and attach it back after the sails are installed. Because it is raised by one plate, it has a tendency to pop off whenever you push down on the ship's body.  Put it back when you have completed the build and are ready to display the model.


Step 3 - The Quarter Deck

There is a raised quarter deck in the aft of the ship but no captain's quarters to speak of.  Step 3 builds the quarter deck.


More green glowing lights for the ship.

Lights on.

Lights off.  Finishing off the deck with the railings.

Step 4 - The Mast and Sails


The last three numbered bags for step 4.


Time to affix the masts to the decks.

Creepy green ghostly appendages.

Masts installed.

Now we just need to attach the sails.  And don't forget to affix the rigging and stickers too (not me though).

The infamous supernatural ghost ship is complete!

Displayed with it's eerie glow.

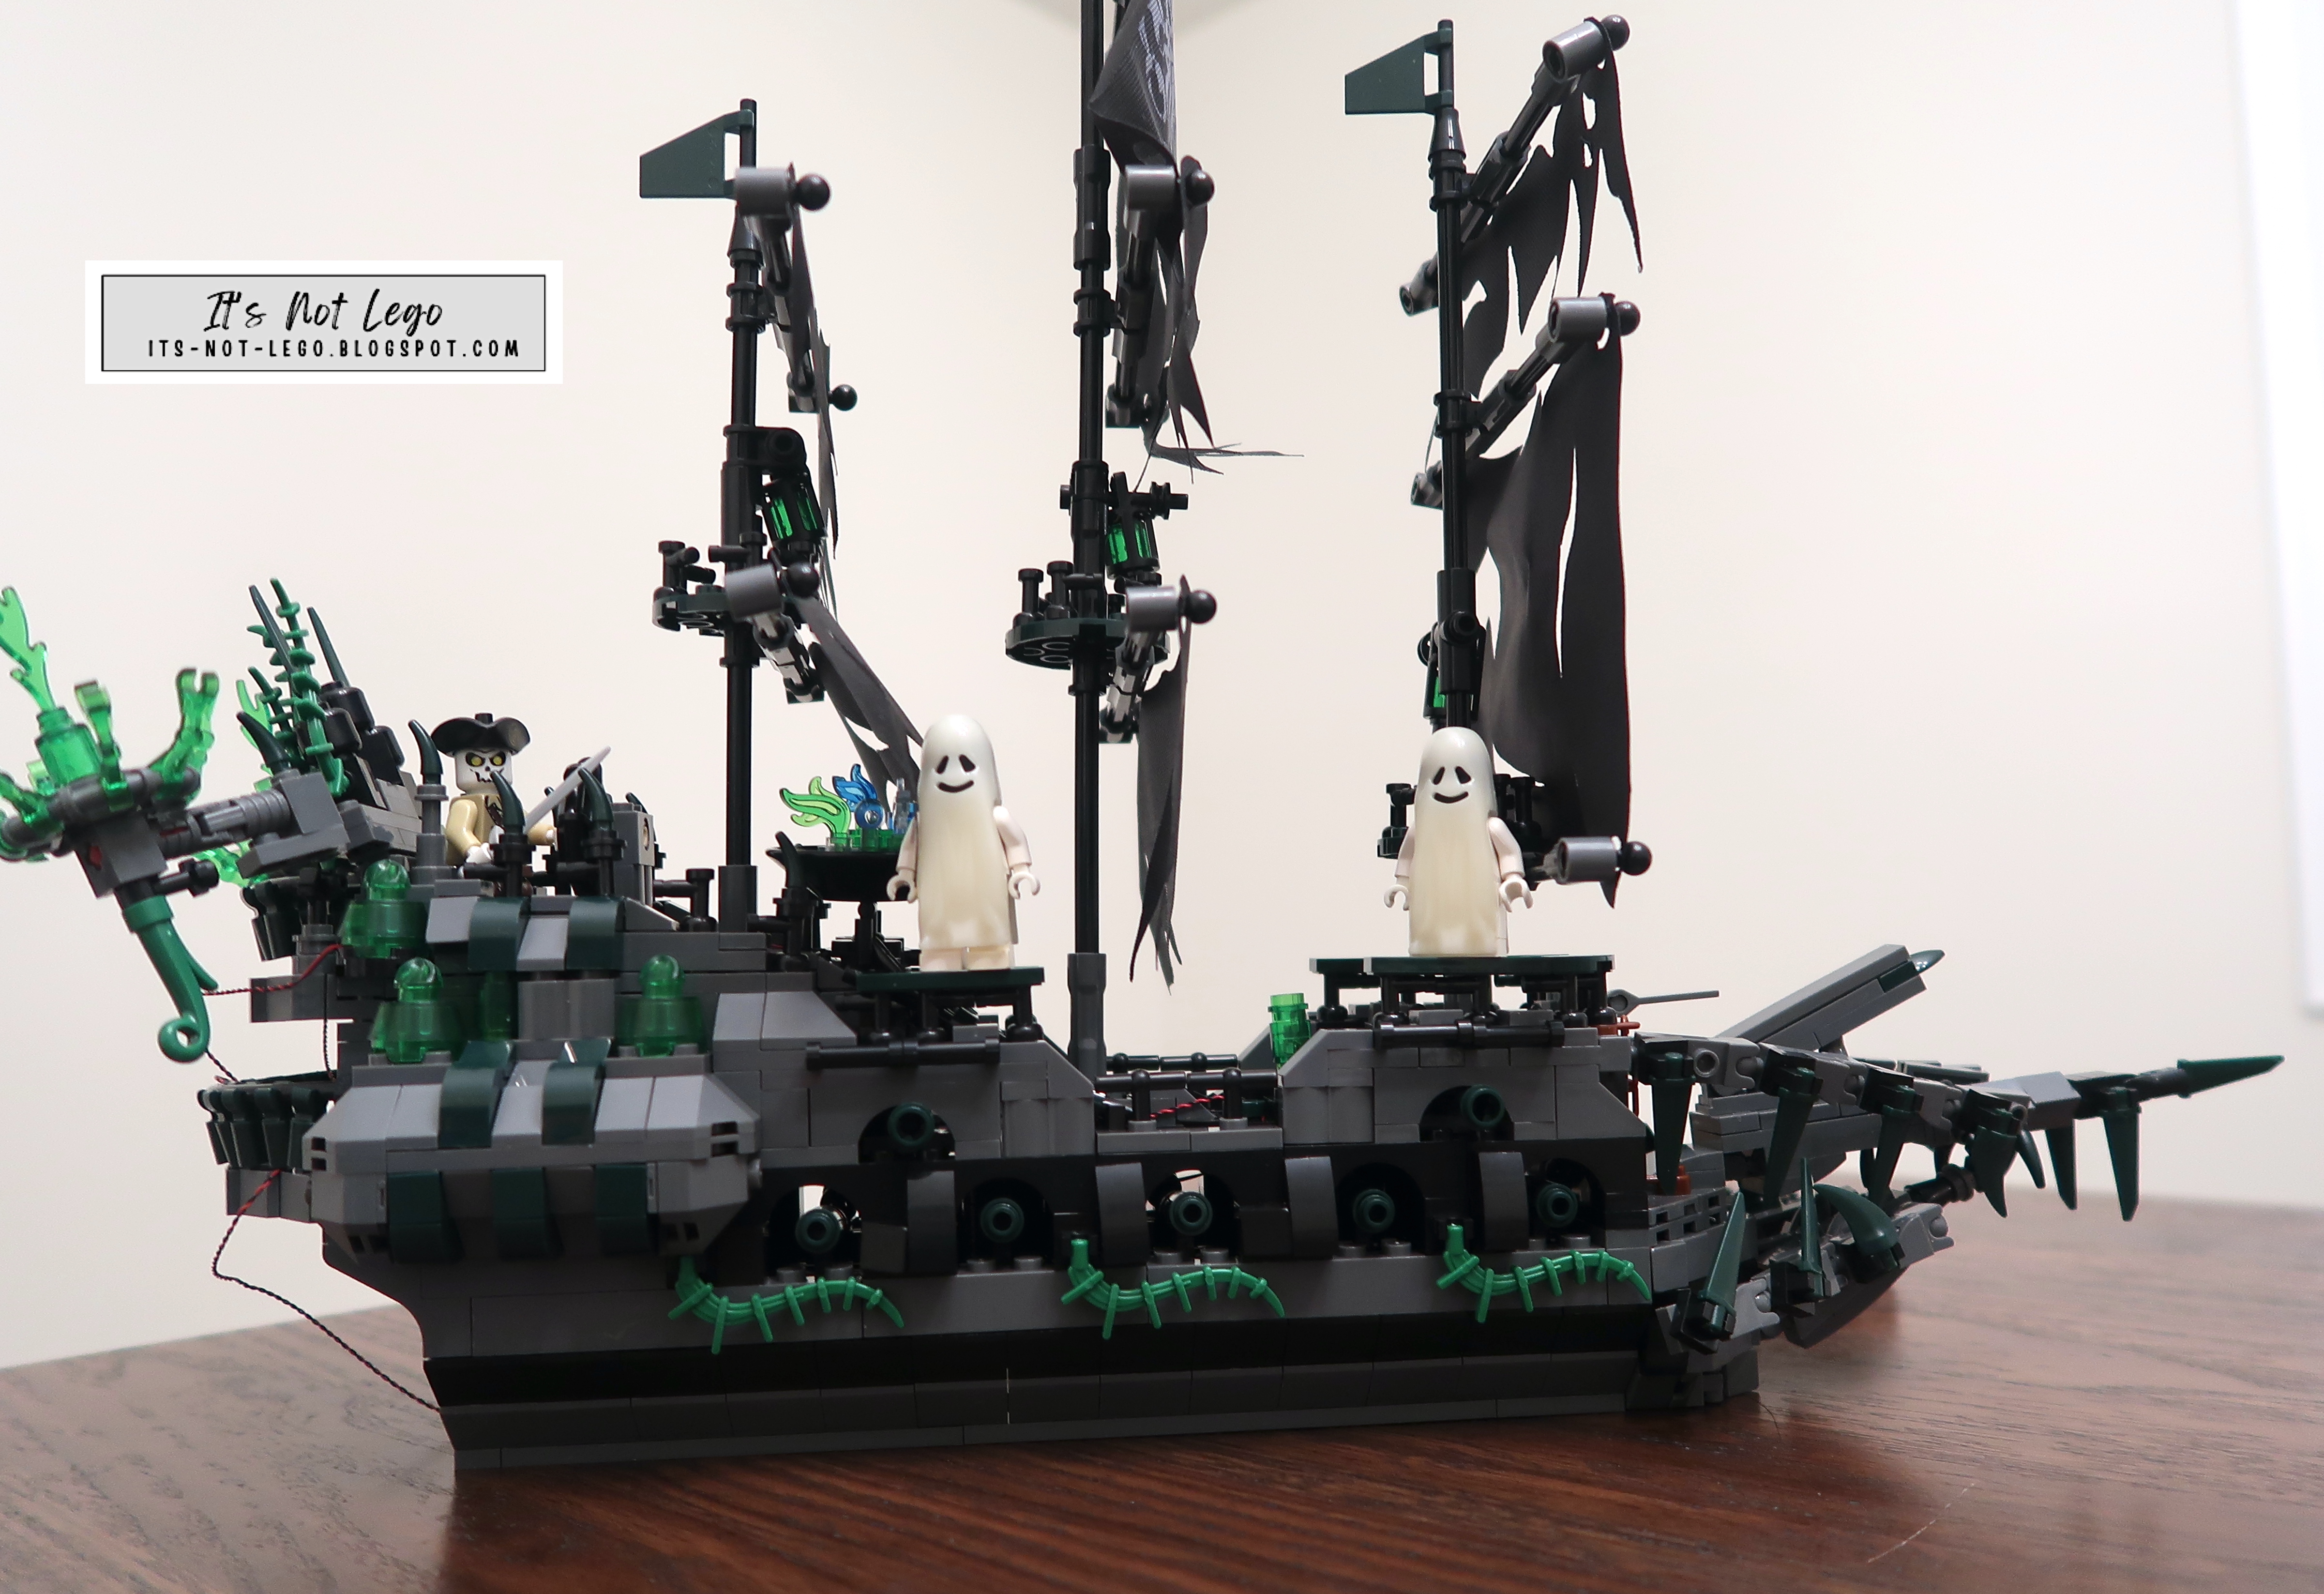
I added some of my own ghostly minifigures to complete the cool display.


This set is a great addition to any pirate ship collectors, the glowing lights make it even more unique.

Thanks for checking out my review of the JMBricklayer Flying Dutchman Ghost Ship 40001.    Bye!

Sunday, December 11, 2022

Lego compatible JMBricklayer Vintage Car K500 Set 50101 Set Review


Hello and welcome back to Its-not-Lego, my blog about the latest Lego alternative interlocking brick sets.  

Today we will be doing a deep dive into another  JMBricklayer set.  They have so kindly provided this set for me to review.


If you are looking for Lego compatible sets at competitive prices, please check out the latest offerings on the JMBricklayer.com website.  They offer free and fast worldwide shipping and free replacement of missing parts.   And save an extra 15% off selected purchases using my code ITSNOTLEGO15%.

This just in, the JMBricklayer December promo now on until Dec 20.  Applies to their Amazon.com store and their website.

Full details here.


Now, here are the details of the set:

Brand: JMBricklayer - updated version of Mould King

Set number: 50101

Theme: Civilization -  Industrial Times

Number of Pieces: 868 pieces

Stickers: No

Minifigures: No

Extra parts: Yes

Deformed or missing parts: Yes (see review below)

Brick clutch and finish: Excellent

Age Rating: 14+


Background

The JMBricklayer 50101 version of the 1936 Mercedes 500K Special Roadster is based on Mould King 10003 set.  This set can also be found as the Nifeliz Retro Car.  I believe the originally designer of this model is Firas Abu Jaber, and he has done a splendid job of recreating the Mercedes in brick form.

This model has been out for well over 2 years now, initially marketed by Mould King and now sold under several other names as well.

Unboxing the K500

My set came with the box, but it was slightly mangled upon receipt.  No matter, here are pictures of the box and it's contents.


There are parts bags numbered 1 thru 4 with the accompanying manual.  I was surprised to find that the bags are actually from Mould King.  


The instruction booklet is 45 pages long with a total of 162 steps and is straightforward enough to follow. 

 The are four sections in the manual correspond directly to the bag numbers.

Section 1 starts on page 1 (steps 1 thru 30)

Section 2 starts on page 11 (steps 31 thru 75)

Section 3 starts on page 22 (steps 76 thru 109)

Section 4 starts on page 34 (steps 110 thru 162)


What immediately struck me was all of the gold plated parts, they were very shiny and for the most part not scratched.  I'm sure it was a cost cutting measure but only the surface areas of the parts were plated and not the underside.  Unfortunately there are some parts where the underside is exposed and therefore they show white instead of gold.

Assembly Pictures

I took pictures of the vintage car build at regular intervals so that you can see the progress.  

The large bag for Section 1 breaks down into 5 smaller bags of parts.

Section 1 builds the chassis and trunk.

There are three smaller parts bag in the larger Section 2 bag.


Section 2 builds the rumble seat and interior.  On to section 3.  Here there are only two parts bags.


Section 3 builds the engine compartment and front grill.  Moving on to section 4 where there are only 2  bags of parts.


There were no major issues during the build such as deformed parts but I did have two small missing pieces.

The tube arm that holds up the windshield divider was missing, as was one of the angled grill pieces, both gold plated.  I decided to forego the windshield divider.


Regarding the missing angled grill, I used some of the extra gold plated clip pieces to replace the lower angled grill.


 The new fix did not affect the overall look of the 500K Roadster, so I did not feel it was necessary to contact JMBricklayer to replace the trivial pieces, but they assured me they would replace any missing pieces.

Overall, I found the brick clutch to be excellent and bricks to be very high quality.  The completed model was very sturdy.

There were a handful of parts leftover from the build and I discovered that two of the pieces were actually new and not mentioned in the manual.  

These parts pertain to the cars horns and replace the white pieces with gold plated pieces.  I'm wondering if this is what differentiates the JMBricklayer version of the set to the Mould King/Nifelix sets.  

I youtubed the videos for Mould King / Nifelix and watched many of the reviews.  From what I could discern, all of those models did not come with the extra gold plated horns.  Or at least the reviewers didn't install them.


Here's the completed K500 Vintage Car (Mercedes 500K).  I love the classic design of this car and that it's so well built.  This model would look so nice on someone's office desk.  It's a definite must have for any classic car buff.


Our special presenter Danbo, will now give you a detailed look at the car and point out all of the special features of this special Mercedes.   

Please note that both driver and passenger doors can open wide.

The engine compartment can also be accessed but the engine is rather small.

But the side exhaust pipes look very classy.

The new fully plated horns have been installed and Danbo says that they look very nice.

The front wheels, which are connected to the steering wheel can actually turn side to side.

A very lux interior.

Danbo noted that every one of the Youtubers who reviewed the Mould King version of this car opened the trunk incorrectly.  This is the proper way.

Fancy chrome tipped exhaust pipes.

Removable full sized spare tire attaches to the trunk deck and doesn't take up any of the trunk space.


Nobody on Youtube mentioned the fact that this car has a foldable rumble seat. When opened, it allows for extra seating in the back. Great for carrying small children and/or pets.  So that makes this Roadster a 2+2!


Summary

I thank JMBricklayer for giving me the opportunity to review this model.  It's not a set I would normally add to my collection, but now that I have it, I have to say it displays beautifully.  And all of doors open and close nicely without falling off, so the clutch is excellent.  I would have given this model 5 out of 5, except because of the two small missing pieces, I can only give it a 4.75 out of 5.  But, in my books it still looks like a 5!

The K500 can be found on the JMBricklayer Amazon store and also on their website.

Use code ITSNOTLEGO15% on the website (sorry, cannot be combined with promotional items).

Danbo and I thank you for visiting, see you next time!