Friday, April 20, 2018

Lepin 15001 Not Lego Brick Bank Set Review - Part One


Hi all, I'm back with another alternate Lego set review.  Today I'll look at the Lepin 15001 Brick Bank modular building set.  Unlike my other Lepin modular sets, this set was missing a number of key pieces, so I had to improvise the construction to complete the build.  I also made some of my own modifications to this set and I'll point these out later in this review.

The Lepin Brick Bank has 2413 pieces according to the information provided on Aliexpress.  I always wonder how accurate these numbers are given that the findings of more or less parts by others who have previously built the Brick Bank modular.  I got the thicker base plate with this set and luckily the base didn't warp too much.

I'm pretty happy with the minifigs that come with this set.  

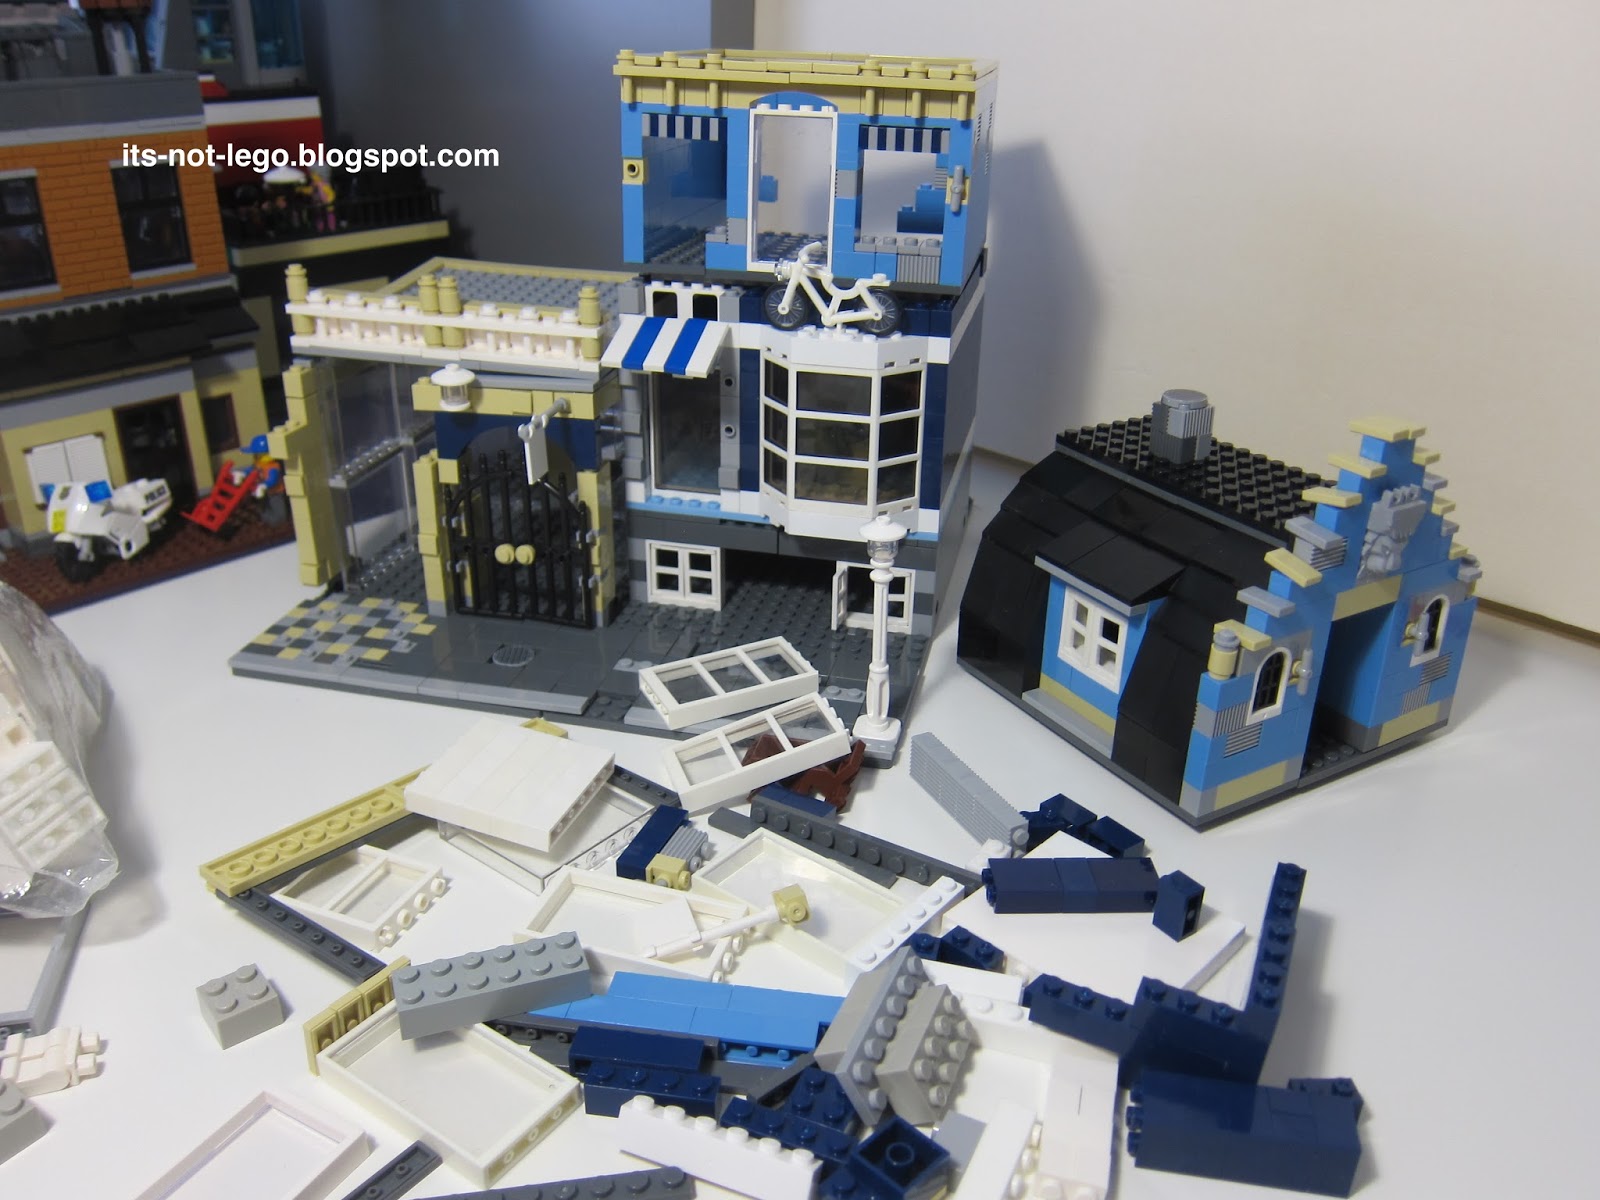
You can see that formation of the brick bank and attached laundromat above.  Got a big stack of cash against the back wall.  I like the design of the bank lobby floor.

I started to build up the walls with the sand blue bricks that came with the set.  And then I thought, hey this is a really unique brick colour that I don't have and it seems kind of wasted that they are on the sides of the building that most will never see.

So just as I had completed the exterior wall, I stopped and reviewed the instruction manual to see where all the sand blue bricks were used.  I then determined where I could sub in a different colour without affecting the overall outward appearance of the Bank.

Since white bricks are pretty common, I swapped out the sand blue walls and replaced them with the white bricks that you see above.  Yeah it does look a bit plainer, so that is the tradeoff.

Here's some another view of the first floor with the white walls.

The gray brick pillars go up as do the windows and doors.  My bank windows were pretty scuffed up so not too happy about that.  The sand blue window and door frames of the laundromat are a nice touch.  The columns are clad in bevelled pieces but these differ greatly from the the pieces you get on the original Lego Brick Bank set.   These ones all have dimples on them and I hate them, they look so shitty.  I would surely replace them, if I can find the correct pieces.

More progress on the first floor interior.  The bank teller window is in and the bank vault gets the grated ceiling that lifts up for easy access.

The original Brick Bank laundromat design uses two window frame parts as the laundry table.  I always try to save window parts for future mocs and mods, so I just used subbed in some regular 1x2 bricks.

Here's another look at the crappy tiles I was talking about earlier.  Yuuck!

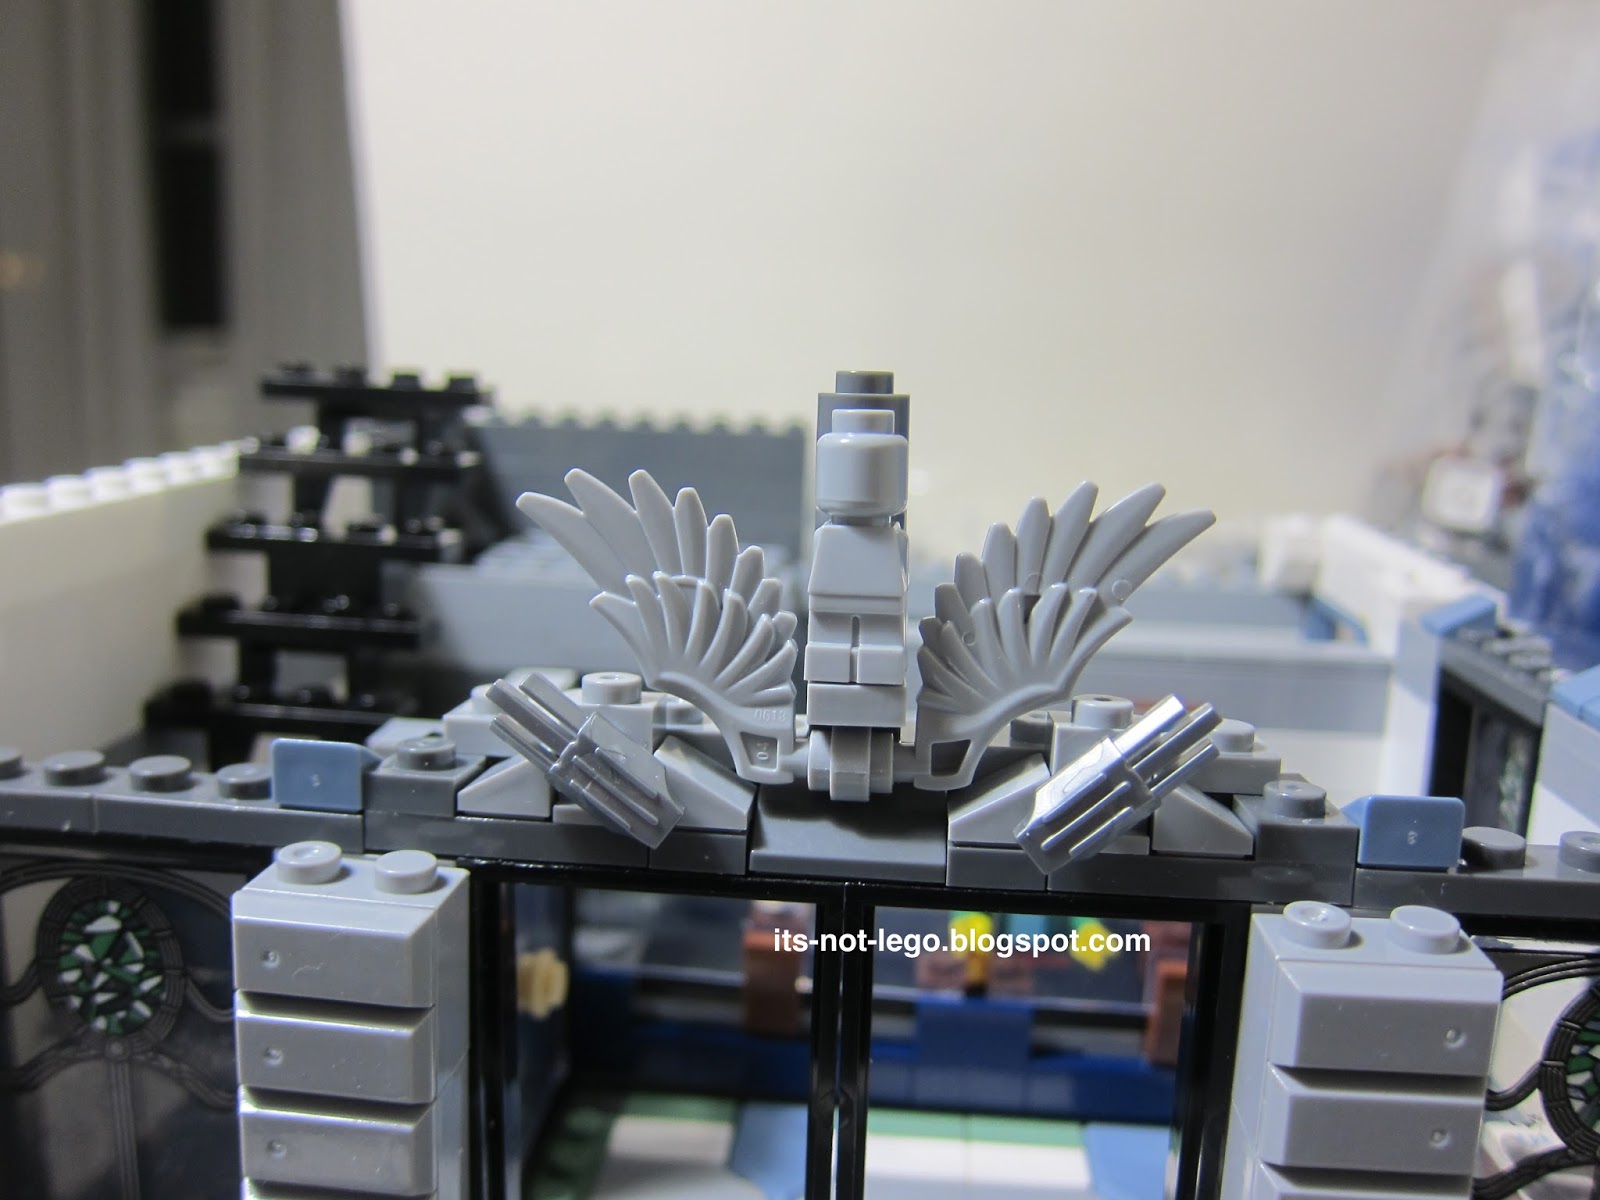
Here's the closeup view of the detailing above the Bank entrance.  Interesting use of wings and wolverine claws here.

Building up the bricks above the windows.  Nice use of the transparent bricks to simulate stained glass.

I was having trouble finding all the parts necessary to putting the vault door in place, so I skipped it.  At this point I was wondering if I had some missing pieces or not.

Here's a look inside the bank vault.  The safety deposit box/washing machines unit put in place.

I found all the parts for the bank vault door!   Luckily the stairs fold up so it was pretty easy to access the vault to install the door.

This is the view of the first floor of the Brick Bank with a better view of the Laundromat.

Here's the laundromat entrance.  The laundromat window glass pane is printed, just like the bank windows.  I was happy that it wasn't too scratched.

Another progress shot of the first floor.

Window arches installed.

Peering into the laundromat.

The vault door will really lock, if you turn the handle on the door.

This is how the ventilation shaft looks like.  The bank robber minifig would lower himself into the shaft to gain entry to the bank vault.   So, the original Brick Bank design only features a one storey wall between the bank and laundromat.  This would make it really easy for any robbers to get access to the bank, just by scaling the wall from the laundromat side.  


I decided to rectify this problem by building up the wall to two storeys.

Now the robbers really have to work at gaining access.

The ventilation shaft is easily removable, just in case your minifig gets stuck inside.

In fact, you can pull out the washing machine unit.  The wall above the laundromat entrance is the only place where the sand blue bricks were preserved.

Here's what the bank, washing machine unit looks like.

There are different holes in the washing machines that let you deposit coins and gems into the bank's safety deposit boxes.

I pulled out the side wall to give you a better view of the laundromat.

Here's a last look at the exterior of the Brick bank with first floor completed.

The bank's exterior wall.

One last look at the laundromat from above.

This ends part one of the Lepin Brick Bank review.  I'll look at the second floor of the bank in greater detail on part two of this blog post coming soon.

Thanks for taking the time to look at the pics!

Tuesday, April 10, 2018

Lepin 15007 Not Lego Market Street Modular Building Updated


These last couple of weeks have been especially chilly so it was comforting just to laze around at home with a mug of hot chocolate and play with my fake Lego brick sets.  I've been wanting to modify my Lepin 15007 Market Street modular, so this was an opportune time to attack the project.


If you don't know what the Lepin Market Street modular building looks like, here it is.  It's an identical bootleg of the Lego Market Street modular model 10190.  If you want to see my past review of the Lepin Market Street modular you can find it here.

The changes I'm showing you today could be applied to either the Lepin clone or the Lego original modular.

My changes are focused primarily on the building itself and not the adjoining covered market stall.

You might know that I'm not a big fan of the Market Street design.  Specifically, I don't like the front facade with it's repetitive use of windows and doors.  I decided to blow out the staircase leading up to the front door.  I also had a spare bay window part and did a test fit on the main floor to see how it would look.

You might have noticed the little bike on top of the bay window.  My plan was to convert the Market Street building into a three storey bike shop. I will review each floor in more detail later in this post.


Here's what the building  looks today.  I've retained the original footprint of the building and the original colours on each of the three floors of the Market Street design.  I also kept intact the beige detail features on the first and second floors.

The overall height of the building hasn't changed too much.  I reduced the height of the raised foundation and increased the remainder of the floor heights, particularly on the third floor. I had to supplement some white and dark gray bricks because I didn't have enough dark blue and light blue bricks to use.

Credit goes out to www.Boxtoy.co for the idea of the Hub sign.  I found it while searching for Lego bike shop pictures on the internet.  Here's the link to their cool moc, the Lego HUB Bike Shop Cafe.

If you recall, the original Market Street design had bricked-in windows in the rear.  I added some windows on the first and second floor.

I might replace the first floor window with a door and add a winch to the second floor to hoist bikes up to the second floor.

I've got a small window and another full height window on the second floor which I can change to a door in future.

On the first floor, I removed the foundation windows and staircase.  The front door was relocated to the side instead of being in the centre in order to accommodate the new bay window.  I added some new steps leading up to the front door and planted some flowers under the bay window.  I retained the original awning and little windows over the front door.  

On the second floor, I added larger windows and the Hub sign on the front.  I toyed with idea of making the entire front all large windows but then changed my mind and decided to put in a smaller window with a flower box instead.

Here is one of the second floor designs I considered.  I might still attach the bike back onto the Hub sign.  Feel free to comment if you prefer the three large window design or the two large and one small window design.


I really liked the little third floor terrace that came with original Market Street design, but I had to get rid of it to accommodate my new studio apartment.  I've kept one of the arched windows and the original door gets replaced by a window.

The terrace is gone, so sad.

The rooftop is removable to access the third floor.

Now, lets look at the inside.   Here's the first floor.  It is dedicated to bike sales and there are a few on display.  I have a counter and computer display/cash.  I need to add some more bike accessories, like bike pumps, handle bars and baskets in future.  I should have added a customer mini figure to keep the clerk company.

Oh, I should mention that the original Market Street building had a staircase right in the middle of each floor.  I decided to move the stairs to the back of the building to allow more useable floor space.

In case you were wondering, the building is completely modular.  Here's all the separate floors and roof.

Here's the second floor interior.  This is where bike service is performed.

It's hard to see but there is a black bike frame on a hoist and the mini figure is drilling the frame.  There's a white bike that's propped up in the corner, ready for service.  I have a small cabinet and a tool rack that sits under the small window.  There is also a rack that holds two bike tires.  I will  add some more detailed pictures in future.

The third floor apartment consists of two rooms, the bathroom and the bedroom.

The bathroom gets it's own door, a toilet, toilet paper dispenser, a sink and shower stall.

The bedroom has a bed, a chair and a night table.  There was a table lamp, but I didn't attach it firmly enough and it fell out.  The only way to get it back in, is to dis-assemble the front facade.

One last look from above.

Here's a pic before I added the window box under the small second floor window.


Hope you have enjoyed this tour of my Lepin Market Street mod.  Thanks for looking!