Sunday, December 11, 2022

Lego compatible JMBricklayer Vintage Car K500 Set 50101 Set Review


Hello and welcome back to Its-not-Lego, my blog about the latest Lego alternative interlocking brick sets.  

Today we will be doing a deep dive into another  JMBricklayer set.  They have so kindly provided this set for me to review.


If you are looking for Lego compatible sets at competitive prices, please check out the latest offerings on the JMBricklayer.com website.  They offer free and fast worldwide shipping and free replacement of missing parts.   And save an extra 15% off selected purchases using my code ITSNOTLEGO15%.

This just in, the JMBricklayer December promo now on until Dec 20.  Applies to their Amazon.com store and their website.

Full details here.


Now, here are the details of the set:

Brand: JMBricklayer - updated version of Mould King

Set number: 50101

Theme: Civilization -  Industrial Times

Number of Pieces: 868 pieces

Stickers: No

Minifigures: No

Extra parts: Yes

Deformed or missing parts: Yes (see review below)

Brick clutch and finish: Excellent

Age Rating: 14+


Background

The JMBricklayer 50101 version of the 1936 Mercedes 500K Special Roadster is based on Mould King 10003 set.  This set can also be found as the Nifeliz Retro Car.  I believe the originally designer of this model is Firas Abu Jaber, and he has done a splendid job of recreating the Mercedes in brick form.

This model has been out for well over 2 years now, initially marketed by Mould King and now sold under several other names as well.

Unboxing the K500

My set came with the box, but it was slightly mangled upon receipt.  No matter, here are pictures of the box and it's contents.


There are parts bags numbered 1 thru 4 with the accompanying manual.  I was surprised to find that the bags are actually from Mould King.  


The instruction booklet is 45 pages long with a total of 162 steps and is straightforward enough to follow. 

 The are four sections in the manual correspond directly to the bag numbers.

Section 1 starts on page 1 (steps 1 thru 30)

Section 2 starts on page 11 (steps 31 thru 75)

Section 3 starts on page 22 (steps 76 thru 109)

Section 4 starts on page 34 (steps 110 thru 162)


What immediately struck me was all of the gold plated parts, they were very shiny and for the most part not scratched.  I'm sure it was a cost cutting measure but only the surface areas of the parts were plated and not the underside.  Unfortunately there are some parts where the underside is exposed and therefore they show white instead of gold.

Assembly Pictures

I took pictures of the vintage car build at regular intervals so that you can see the progress.  

The large bag for Section 1 breaks down into 5 smaller bags of parts.

Section 1 builds the chassis and trunk.

There are three smaller parts bag in the larger Section 2 bag.


Section 2 builds the rumble seat and interior.  On to section 3.  Here there are only two parts bags.


Section 3 builds the engine compartment and front grill.  Moving on to section 4 where there are only 2  bags of parts.


There were no major issues during the build such as deformed parts but I did have two small missing pieces.

The tube arm that holds up the windshield divider was missing, as was one of the angled grill pieces, both gold plated.  I decided to forego the windshield divider.


Regarding the missing angled grill, I used some of the extra gold plated clip pieces to replace the lower angled grill.


 The new fix did not affect the overall look of the 500K Roadster, so I did not feel it was necessary to contact JMBricklayer to replace the trivial pieces, but they assured me they would replace any missing pieces.

Overall, I found the brick clutch to be excellent and bricks to be very high quality.  The completed model was very sturdy.

There were a handful of parts leftover from the build and I discovered that two of the pieces were actually new and not mentioned in the manual.  

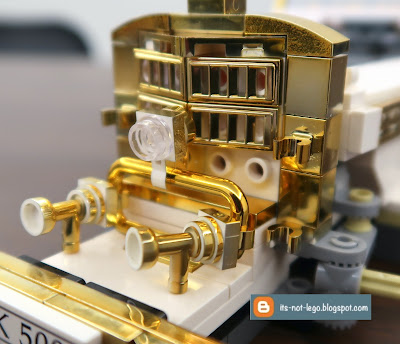
These parts pertain to the cars horns and replace the white pieces with gold plated pieces.  I'm wondering if this is what differentiates the JMBricklayer version of the set to the Mould King/Nifelix sets.  

I youtubed the videos for Mould King / Nifelix and watched many of the reviews.  From what I could discern, all of those models did not come with the extra gold plated horns.  Or at least the reviewers didn't install them.


Here's the completed K500 Vintage Car (Mercedes 500K).  I love the classic design of this car and that it's so well built.  This model would look so nice on someone's office desk.  It's a definite must have for any classic car buff.


Our special presenter Danbo, will now give you a detailed look at the car and point out all of the special features of this special Mercedes.   

Please note that both driver and passenger doors can open wide.

The engine compartment can also be accessed but the engine is rather small.

But the side exhaust pipes look very classy.

The new fully plated horns have been installed and Danbo says that they look very nice.

The front wheels, which are connected to the steering wheel can actually turn side to side.

A very lux interior.

Danbo noted that every one of the Youtubers who reviewed the Mould King version of this car opened the trunk incorrectly.  This is the proper way.

Fancy chrome tipped exhaust pipes.

Removable full sized spare tire attaches to the trunk deck and doesn't take up any of the trunk space.


Nobody on Youtube mentioned the fact that this car has a foldable rumble seat. When opened, it allows for extra seating in the back. Great for carrying small children and/or pets.  So that makes this Roadster a 2+2!


Summary

I thank JMBricklayer for giving me the opportunity to review this model.  It's not a set I would normally add to my collection, but now that I have it, I have to say it displays beautifully.  And all of doors open and close nicely without falling off, so the clutch is excellent.  I would have given this model 5 out of 5, except because of the two small missing pieces, I can only give it a 4.75 out of 5.  But, in my books it still looks like a 5!

The K500 can be found on the JMBricklayer Amazon store and also on their website.

Use code ITSNOTLEGO15% on the website (sorry, cannot be combined with promotional items).

Danbo and I thank you for visiting, see you next time!

Sunday, November 27, 2022

Lego Compatible Set Review: Keeppley K10211 Long March 2F and Shenzhou Spacecraft


Hello brick fans and rocket fans!

Keeppley/Enlighten has released their latest Chinese Aerospace sets for 2022 and I'll be reviewing one of the sets from the theme.  Today's set review is the Long March 2F rocket and Shenzhou spacecraft.  This is a kit that includes both spacecraft.

About the Long March rocket and Shenzhou spacecraft

The Long March 2F two stage rocket is part of the Chinese Long March family of rockets. It first went into service in 1999 to replace it's troublesome predecessor the Long March 2E.  It was used to successfully launch the Shenzhou 5 spacecraft carrying China's first astronaut into space.  Both of the Long March and Shenzhou spacecraft are still being used today.

Here are the respective wiki pages for both the Long March rocket and the Shenzhou spacecraft.


This Keeppley Long March 2F set is just one of several Aerospace sets that can be found on  Afobrick.com, one of the leading online retailers of Lego compatible building block sets.   Afobrick.com provides free worldwide shipping and free parts replacement if needed.

Here are the set details

The Brand:  Keeppley

Set name: K10211 Long March 2F and ShenZhou Spacecraft

Theme: Aerospace

Ages: 6+

Number of Pieces: approx 813 pcs (by my count)

Stickers:  None

Printed parts: Yes, quite a few!

Minifigures: None

Missing or deformed pieces:  None!

Extra parts leftover: Yes!

Check it out here:

Don't forget to save another 5% off if you use ITSNOTLEGO at checkout


I like the fact that Keeppley always numbers their bags of parts and each bag corresponds to the section you are building in the included instruction manual.  The Long March set also comes with 5 sectional bags, 2 supplementary parts bags and 2 16x16 baseplates.

Interestingly, although the Keeppley set number is designated as K10211, my manual says K10212.  

I'm wondering if I got the Chinese domestic version of the set, as the wording in the manual is in Chinese.  The first two pages of the manual look like the specifications for the spacecraft.  The rest of the manual and instructions is pretty much intuitive and language agnostic.

The manual has 70 pages with steps A1 thru A73 (pages 1 thru 34) building the Long March rocket and steps B1 thru B130 (pages 35 thru 70) building the Shenzhou spacecraft and it's stand.


The bricks in this set were very high quality and they clutched really well. As a result, I never had to use the brick separator that was included.

Step One: Launchpad


Step Two: Main stage rocket and booster rockets


Here are the four booster rockets that are easily clipped on to the main rocket fuselage.  As I soon came to discover, there are quite a few printed parts and no stickers whatsoever, yay!

The main rocket shown with boosters attached and installed onto the launchpad.  Yes, those are printed parts on the main rocket, not stickers.

Step Three: The Payload Section


The payload on the Long March rocket can either be the Shenzhou spacecraft or parts of the Tiangong space station.   The payload flaps and chinese flag on the fairing are printed parts.

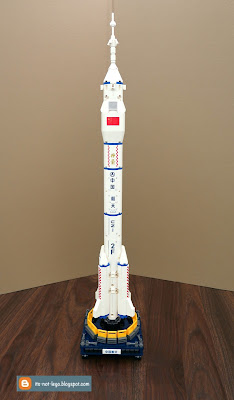
Here is the assembled Long March 2F rocket which stands approximately 21 inches high.


Not sure why, but there isn't any printing on the reverse side of the rocket.


Step Four: Shenzhou spacecraft


Step four builds the Shenzhou spacecraft consisting of three modules. From top to bottom, these are the orbital module, the reentry module in the middle and the service module.  

Step Five: The Solar Panels and Display Stand


Printed pieces for the solar panels.

The trans blue stand is adjustable.

The solar panels can be swivelled.


I've placed one of my minifigures with the Shenzhou spacecraft so you can get  a sense of the scale of the assembled model.  I think the Shenzhou would have to be increased by another 3 to 4 times in size to be minifig scale (just guessing).

Oh, did you know that the Shenzhou spacecraft was featured in the movie Sandra Bullock/George Clooney movie Gravity?

After building the Long March rocket, I thought it would be fun to see if I can make it look like it was lifting off from the launchpad.  See the before and after pics below.


The rocket was originally secured to the base/launchpad via a short technic pin. I replaced it with a much longer pin to raise the rocket ship off of the base.  Then, I attached some flame pieces to each of the rocket and booster nozzles.  What do you think of the mod, does it make the rocket look better?  Let me know!


This was a satisfying building set that took less than a day to complete.  Although the parts count is not indicated anywhere, neither on the manual or on the Afobrick website.  I did a manual count of all the pieces used.

The Long March 2F rocket consisted of 400 pieces.  That included 195 pieces for the stand, 116 pieces to build the 4 booster rockets and 89 pieces for the main rocket.
The Shenzhou spacecraft is comprised of 421 pieces and 12 pieces of trans-blue parts for the stand.  Total part count came to 833 pieces, by my estimation.

I wanted to take some of my wife's cotton balls that she uses to clean her face, to simulate the smoke billowing from the rockets, but sadly, she said no.  ðŸ˜ž

This set makes a nice display piece for anyone who enjoys model rockets.
One day, maybe, I will build a launch tower next to the rocket and increase the size of the launchpad.  But I will save that for another project.  Anyways, thx for looking.

Here's the set link again: https://afobrick.com/en-ca/products/keeppley-k10211-long-march-2f-and-shenzhou-spacecraft and remember to use my discount code itsnotlego to get another 5% off.

Bye!