Hey brick fans!
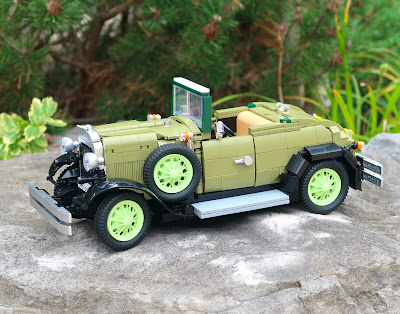
I'm here to review the latest exclusive building set from JMBricklayer! It's an exquisite reproduction of a 1931 Ford Model A and it can be built both as a coupe and as a roadster.
About the Model A Vintage Car
The Model A was a very popular car that was produced by the Ford Motor company between 1927 and 1931, selling almost 5 million units. 1931 was the final model year before Ford phased out the Model A and subsequently introduced the model B. For vintage car lovers, you can find more information about the Ford Model A here: https://en.wikipedia.org/wiki/Ford_Model_A_(1927%E2%80%931931)
This JMBricklayer Model A is very similar to one found that was featured for sale in the St. Louis Car Museum. https://www.stlouiscarmuseum.com/vehicles/407/1931-ford-model-a-deluxe-coupe. JMBricklayer made it even more special in this green and dark green livery. The light green rims are particularly striking!
About JMBricklayer
Thanks to JMBricklayer for providing the set for today's review! They are a leading provider of high quality, Lego compatible building block sets where you can choose from a variety of themes such as Vehicles, Ships, Trains, Military, Sci-fi and much more.
Latest update from JMBricklayer (limited time offer)!
Use the discount codes below for Model A 50001:
① For US customers:
20% off, no limit, valid for 9.20-9.27
MODELA20
② For worldwide customers:
15% off, no limit, permanently valid for all non-discounted items:
JMBVIP15%
See other offers below!
About the Set
The set name and number is the
Vintage Car Model A Deluxe Coupe 50001 featuring 1297 pieces. Some of the special features of this model include turnable front wheels, removable roof, opening engine compartment, real rubber tires, and opening doors and rear rumble seat/trunk. And of course we can't forget about the lighting. This kit has headlights, sidelights, taillights and even interior lighting that makes it look more amazing. We will look at these feature sin more detail later in this review. Ok, can't wait to build and review the Model A!
Unboxing the contents
As with all JMBricklayer building block sets, it comes in a very sturdy box that showcases the model very nicely.
Inside the box, we find the handy instruction manual, two bags containing the special light kit, several parts bags that are numbered 1, 2 and 3. We will look at the bag contents later.
One of the lighting kit bags contains the battery pack which uses 3 AA batteries, not included.
The other bag contains the lighting components which include a multi-port board, a USB plug, and several led lights with wires attached.
Don't worry, if this is your first time building a set with a lighting kit, because the JMBricklayer manual shows you detailed easy to follow instructions on how to attach all the lighting components and integrate them into the car.
Building the Model A
There are three major steps involved to build the Classic Model A, and you would use the parts bags that are numbered accordingly to build that step.
Step 1
For step 1, we will build the frame and undercarriage for the car.
There are a total of 8 bags of parts used in step 1.
However, there is a bag that contains all of the wheel assemblies and I think this should be labelled for use in step 3, because it's too early to put the wheels on in step 1.
One of the cool features about the set is the steerable front wheels. Here you can see the beginnings of the turning mechanism. There are gears that will be later attached to the steering wheel so that when you turn the steering wheel, the front wheels will also turn in the same direction!
Here's a look at the undercarriage construction.
And here is step 1 completed. The build quality and clutch for the bricks is excellent. Now we can move on to the body assembly in step 2.
Step 2
For step 2, we will be assembling the engine compartment, the front grill and headlights, the sidelights, the interior and the trunk!
There are 13 numbered bags for this step.
I think Step 2 will be the most comprehensive section in this build, just by looking at all of the parts.
Now we can use the special lighting kit and put the headlights on the car. The silver parts used on the grill are shiny but not quite chrome.
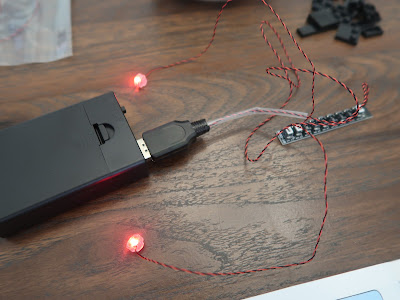
It's a good idea to test the components before installing them because you want to make sure all of the lighting components are working properly. Here you can see that I've attached the headlights to the front grill and then attached the wires to the board. I've also attached the USB plug to the board and that plugs into the battery box, which is powered by 3 AA batteries which you will need to provide yourself.
The connection board will be installed into the trunk later.
The Model A used a 4 cylinder engine as it's powerplant and that is faithfully reproduced in the set.
We will need to attach the sidelights and before we do, we should test that they work as well.
Ditto for the rear taillights.
Here is the engine housing.
And here we are building the interior of the vehicle. As you can see from the picture, the headlight and sidelight wires all feed into the interior under the floor and under the seat to the rear of the car.
As mentioned earlier, the lighting board will be hidden inside the trunk behind the seat. We do another final lighting test before embedding the board.
I love that the doors and the rear trunk/rumble seat can be opened and closed.
With step 2 completed, we can now move to step 3 to complete the Model A!
Step 3
The final assembly of the Model A will consist of the final touches such as mounting all the wheels, bumpers, front and rear fenders and the roof, which can be removed.
There are 5 bags for step 3 and don't forget that the wheels are from a bag in step 1.
The parts for step 3 include many shiny silver pieces that will be used for the bumpers. I like that the window glass is thoughtfully packaged separately so as not to be scratched.
Here's a look at the wheel assemblies which we found in the step 1 parts bags.
With all of the final pieces attached, the Vintage Model A looks spectacular!
Here is the back side of the car
Here is the opening hood for the engine, you can open it from either side.
The front wheels can be steered from side to side.
A very beautiful coupe!
But I cannot lie, I much prefer the Model A as a roadster!
Do you prefer the JMBricklayer Vintage car Model A as a coupe or a roadster? In either case, the car displays beautifully and is a nice collector's item for classic car collectors!
Where to get the Model A Deluxe Coupe?
Note – Spend $69.99 or more and receive a lovely complimentary gift. Offer available on a first-come, first-served basis while stocks last.
Also available on Amazon: https://amz.run/50001 (15% off code for social media: MODELA15) to get a further discount from the price of $69.94.
For US Amazon, the website link
https://www.amazon.com/dp/B0D7HNG3MB, the coupon code
VIPLEGS15 for US Amazon applies only to the non-discounted Model A 50001 and is valid for one month, offering a 15% discount.
Hope you have enjoyed this review! Bye for now!


No comments:
Post a Comment